FortiGate
Connect an office behind a FortiGate firewall to a Vipilink network with one IPsec tunnel between a Vipilink gateway and the FortiGate. The tunnel is route-based: the FortiGate sends traffic for the Vipilink network into the tunnel with a static route.
Before you start
- A Vipilink network with at least one active gateway.
- A FortiGate with a static public IP on its WAN interface, and an admin account that can change VPN, routing and firewall settings.
- The Vipilink network subnet and the office subnet must not overlap.
The screens on this page are from FortiOS 7.6.
Example used on this page
| Item | Example value |
|---|---|
| Vipilink network | Cloud, subnet 10.14.0.0/16 |
| Vipilink gateway | New Jersey |
| Office subnet behind the FortiGate | 10.254.94.0/24 |
| Tunnel name in Vipilink | HQFortiGate |
| Tunnel and object names on the FortiGate | vipilink-cloud, office-lan |
Replace these with your own values.
Settings that must match
Both sides of the tunnel must use the same values. This page uses the Vipilink defaults.
| Setting | Vipilink | FortiGate |
|---|---|---|
| IKE version | V2 | Version 2 |
| Phase 1 encryption and integrity | aes256, sha256 | AES256 - SHA256 |
| Phase 1 Diffie-Hellman group | 14 | 14 |
| Phase 1 lifetime | IKE Lifetime 8h | Key lifetime 28800 seconds |
| Phase 2 encryption and integrity | aes256, sha256 | AES256 - SHA256 |
| Phase 2 Diffie-Hellman group | 14 | Perfect forward secrecy (PFS) on, group 14 |
| Phase 2 lifetime | Tunnel Lifetime 1h | Key lifetime 3600 seconds |
| Pre-shared key | Pre-Shared Key | Pre-shared key |
Step 1: Add the tunnel in Vipilink
- In the Vipilink console, go to Networks → Networks and open your network. Copy the public IP shown on the gateway card. You need it on the FortiGate.
- On the gateway card, click the ... menu and choose Add Tunnel.
- Choose IPsec Site-to-Site Tunnel and click Continue. Then choose Single-Tunnel and click Continue.
-
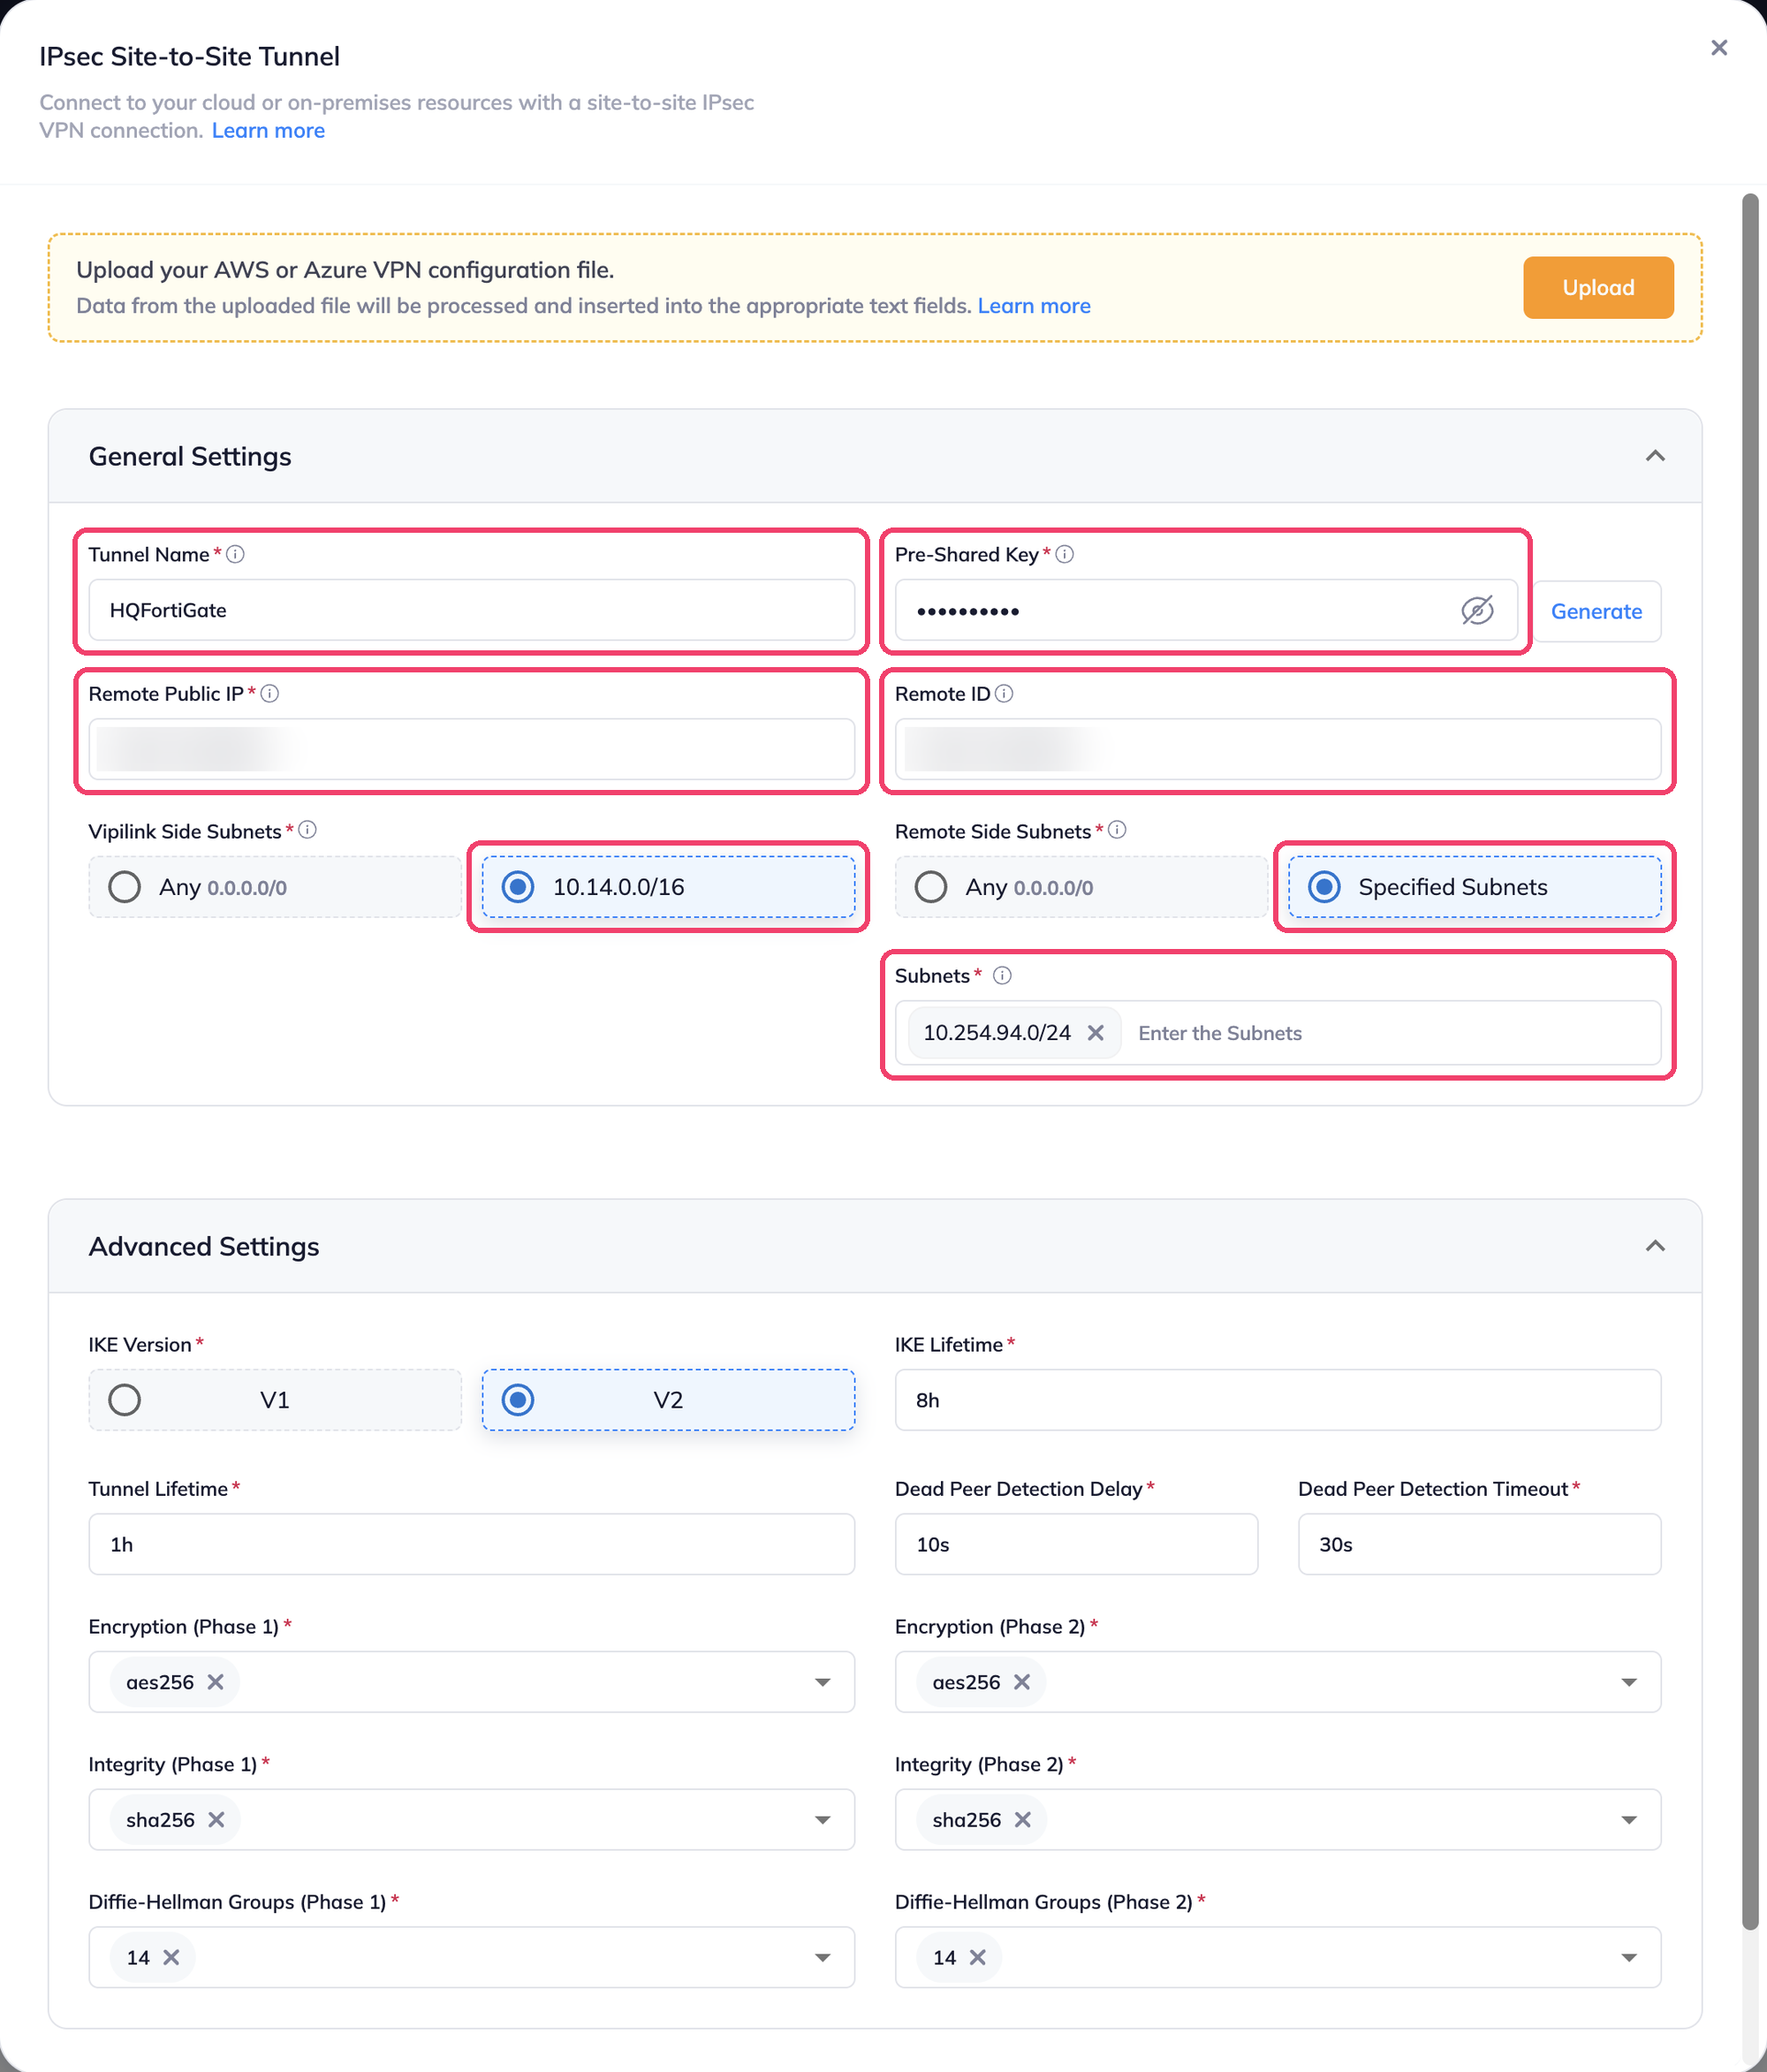
Fill in the form:
Field Value Tunnel Name HQFortiGate. Letters and numbers only.Pre-Shared Key Click Generate and copy the key. You enter the same key on the FortiGate. Remote Public IP The FortiGate WAN public IP Remote ID The FortiGate WAN public IP Vipilink Side Subnets The network subnet, for example 10.14.0.0/16Remote Side Subnets Specified Subnets, then enter the office subnet, for example 10.254.94.0/24 -
Keep the Advanced Settings defaults.
-
Click Add Tunnel. The tunnel card shows Down until the FortiGate side is set up.
Because you entered the office subnet under Remote Side Subnets, Vipilink adds the route for you. Open the network's Route Table to see it with the type Propagated. You don't need to add a route yourself.

Step 2: Let users reach the office subnet
If the network uses split tunneling in Manual mode, add the office subnet so connected users send that traffic through Vipilink:
- On the network card, click the ... menu and choose Split Tunneling.
- Under Manual, enter the office subnet, for example
10.254.94.0/24, and press Enter. - Click Apply.
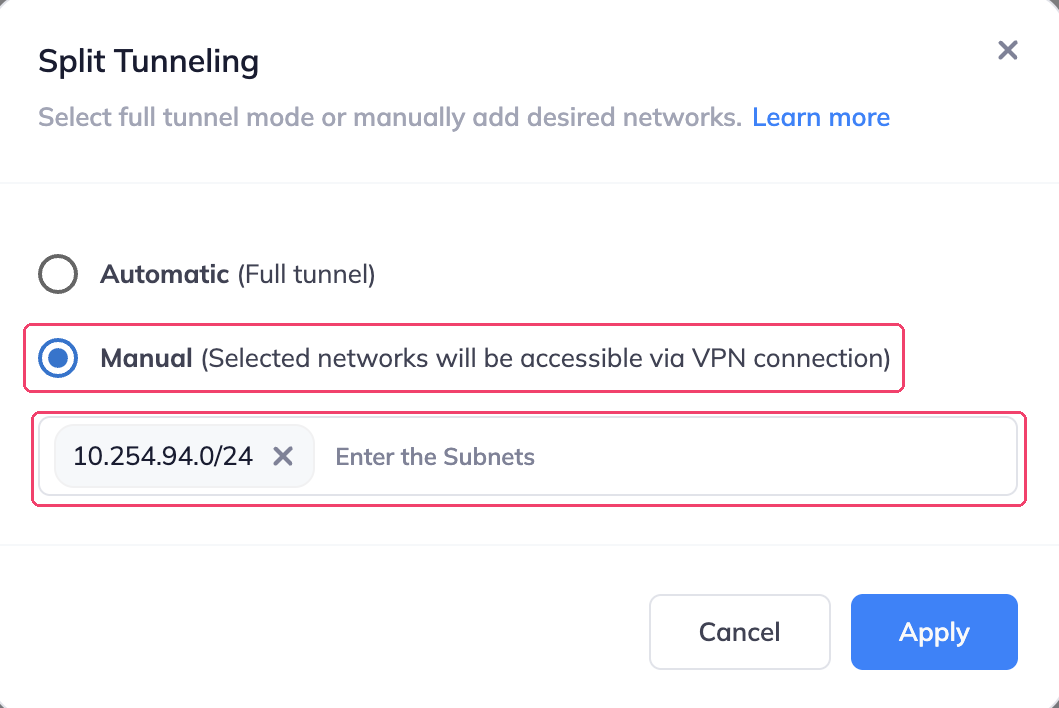
In Automatic (Full tunnel) mode there is nothing to change.
If the network's firewall is on, add a rule that allows users to reach the office subnet.
Step 3: Create the address objects on the FortiGate
Create one address for the Vipilink network and one for the office subnet. The policies and the routes use them.
- In the FortiGate, go to Policy & Objects → Addresses and click Create new.
-
Create the Vipilink address:
Field Value Name vipilink-cloudInterface any Type Subnet IP/Netmask The Vipilink network subnet, for example 10.14.0.0/16Routing configuration On. Without it, you can't choose this address as the destination of a static route. 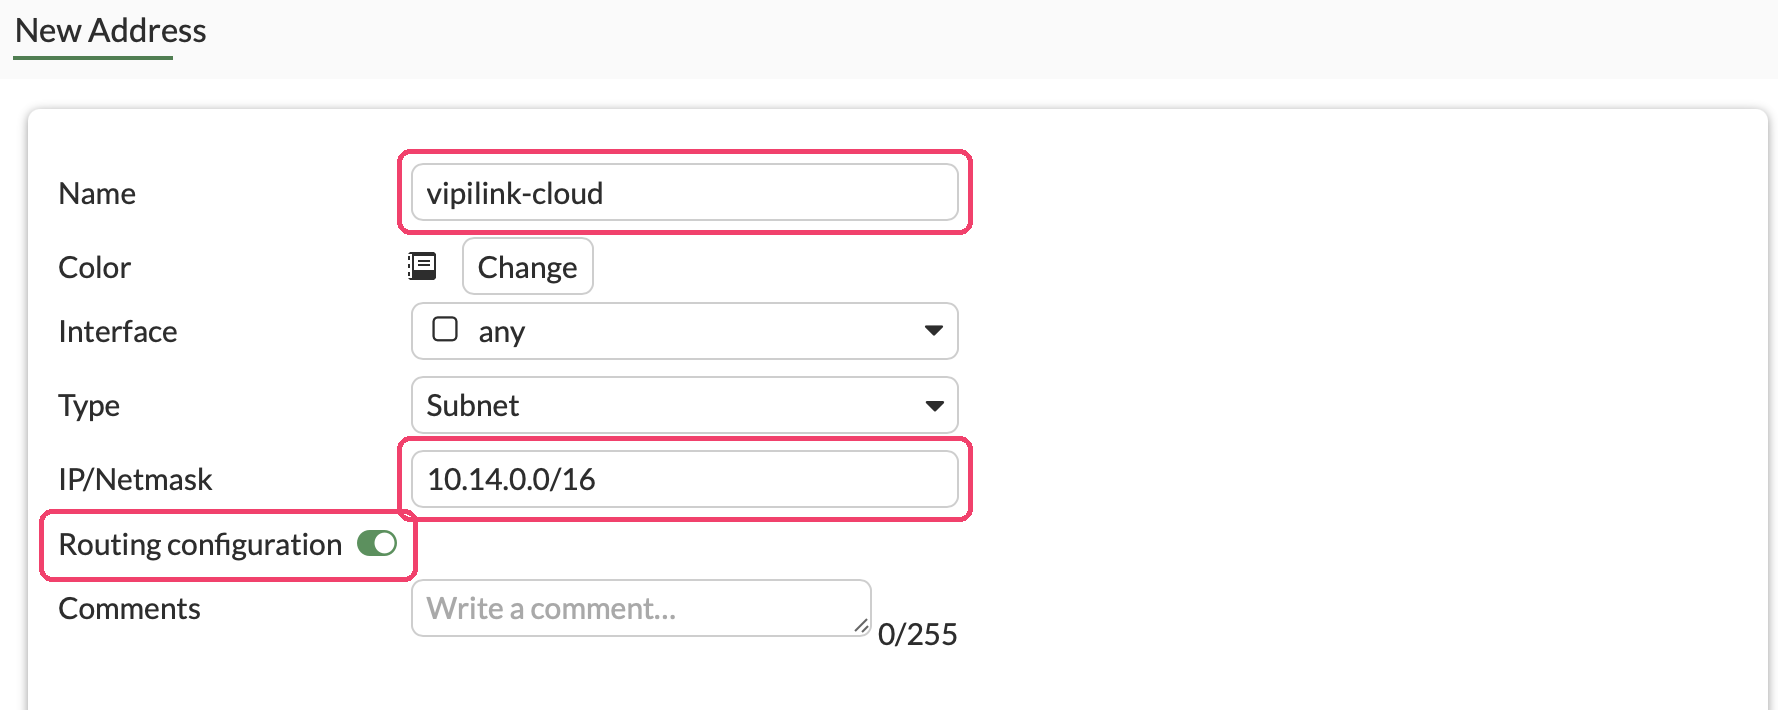
-
Click OK.
-
Click Create new again and create the office address:
Field Value Name office-lanInterface any Type Subnet IP/Netmask The office subnet, for example 10.254.94.0/24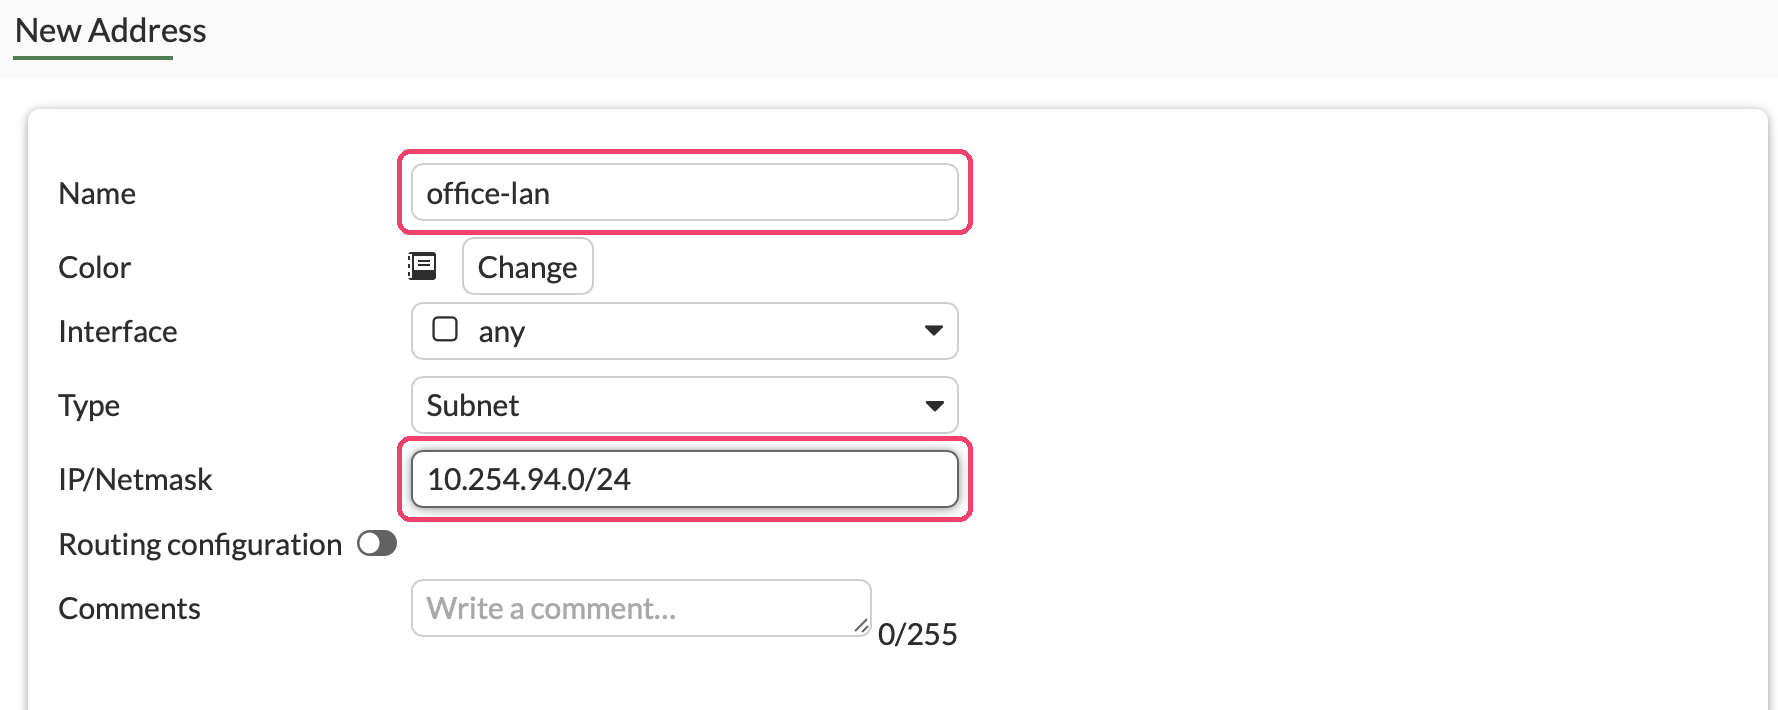
-
Click OK.
Already have an address for the office subnet?
You can use it instead of office-lan. Don't change it, because other policies may use it.
Step 4: Create the IPsec tunnel on the FortiGate
-
Go to VPN → VPN Tunnels, click Create new and choose Custom IPsec tunnel.

-
Fill in the top of the form:
Field Value Name vipilink-cloudRemote gateway Static IP address IP address The Vipilink gateway public IP from Step 1 Interface Your WAN interface Method Pre-shared Key Pre-shared key The key you generated in Vipilink IKE Version 2 Keep the other Network settings at their defaults.
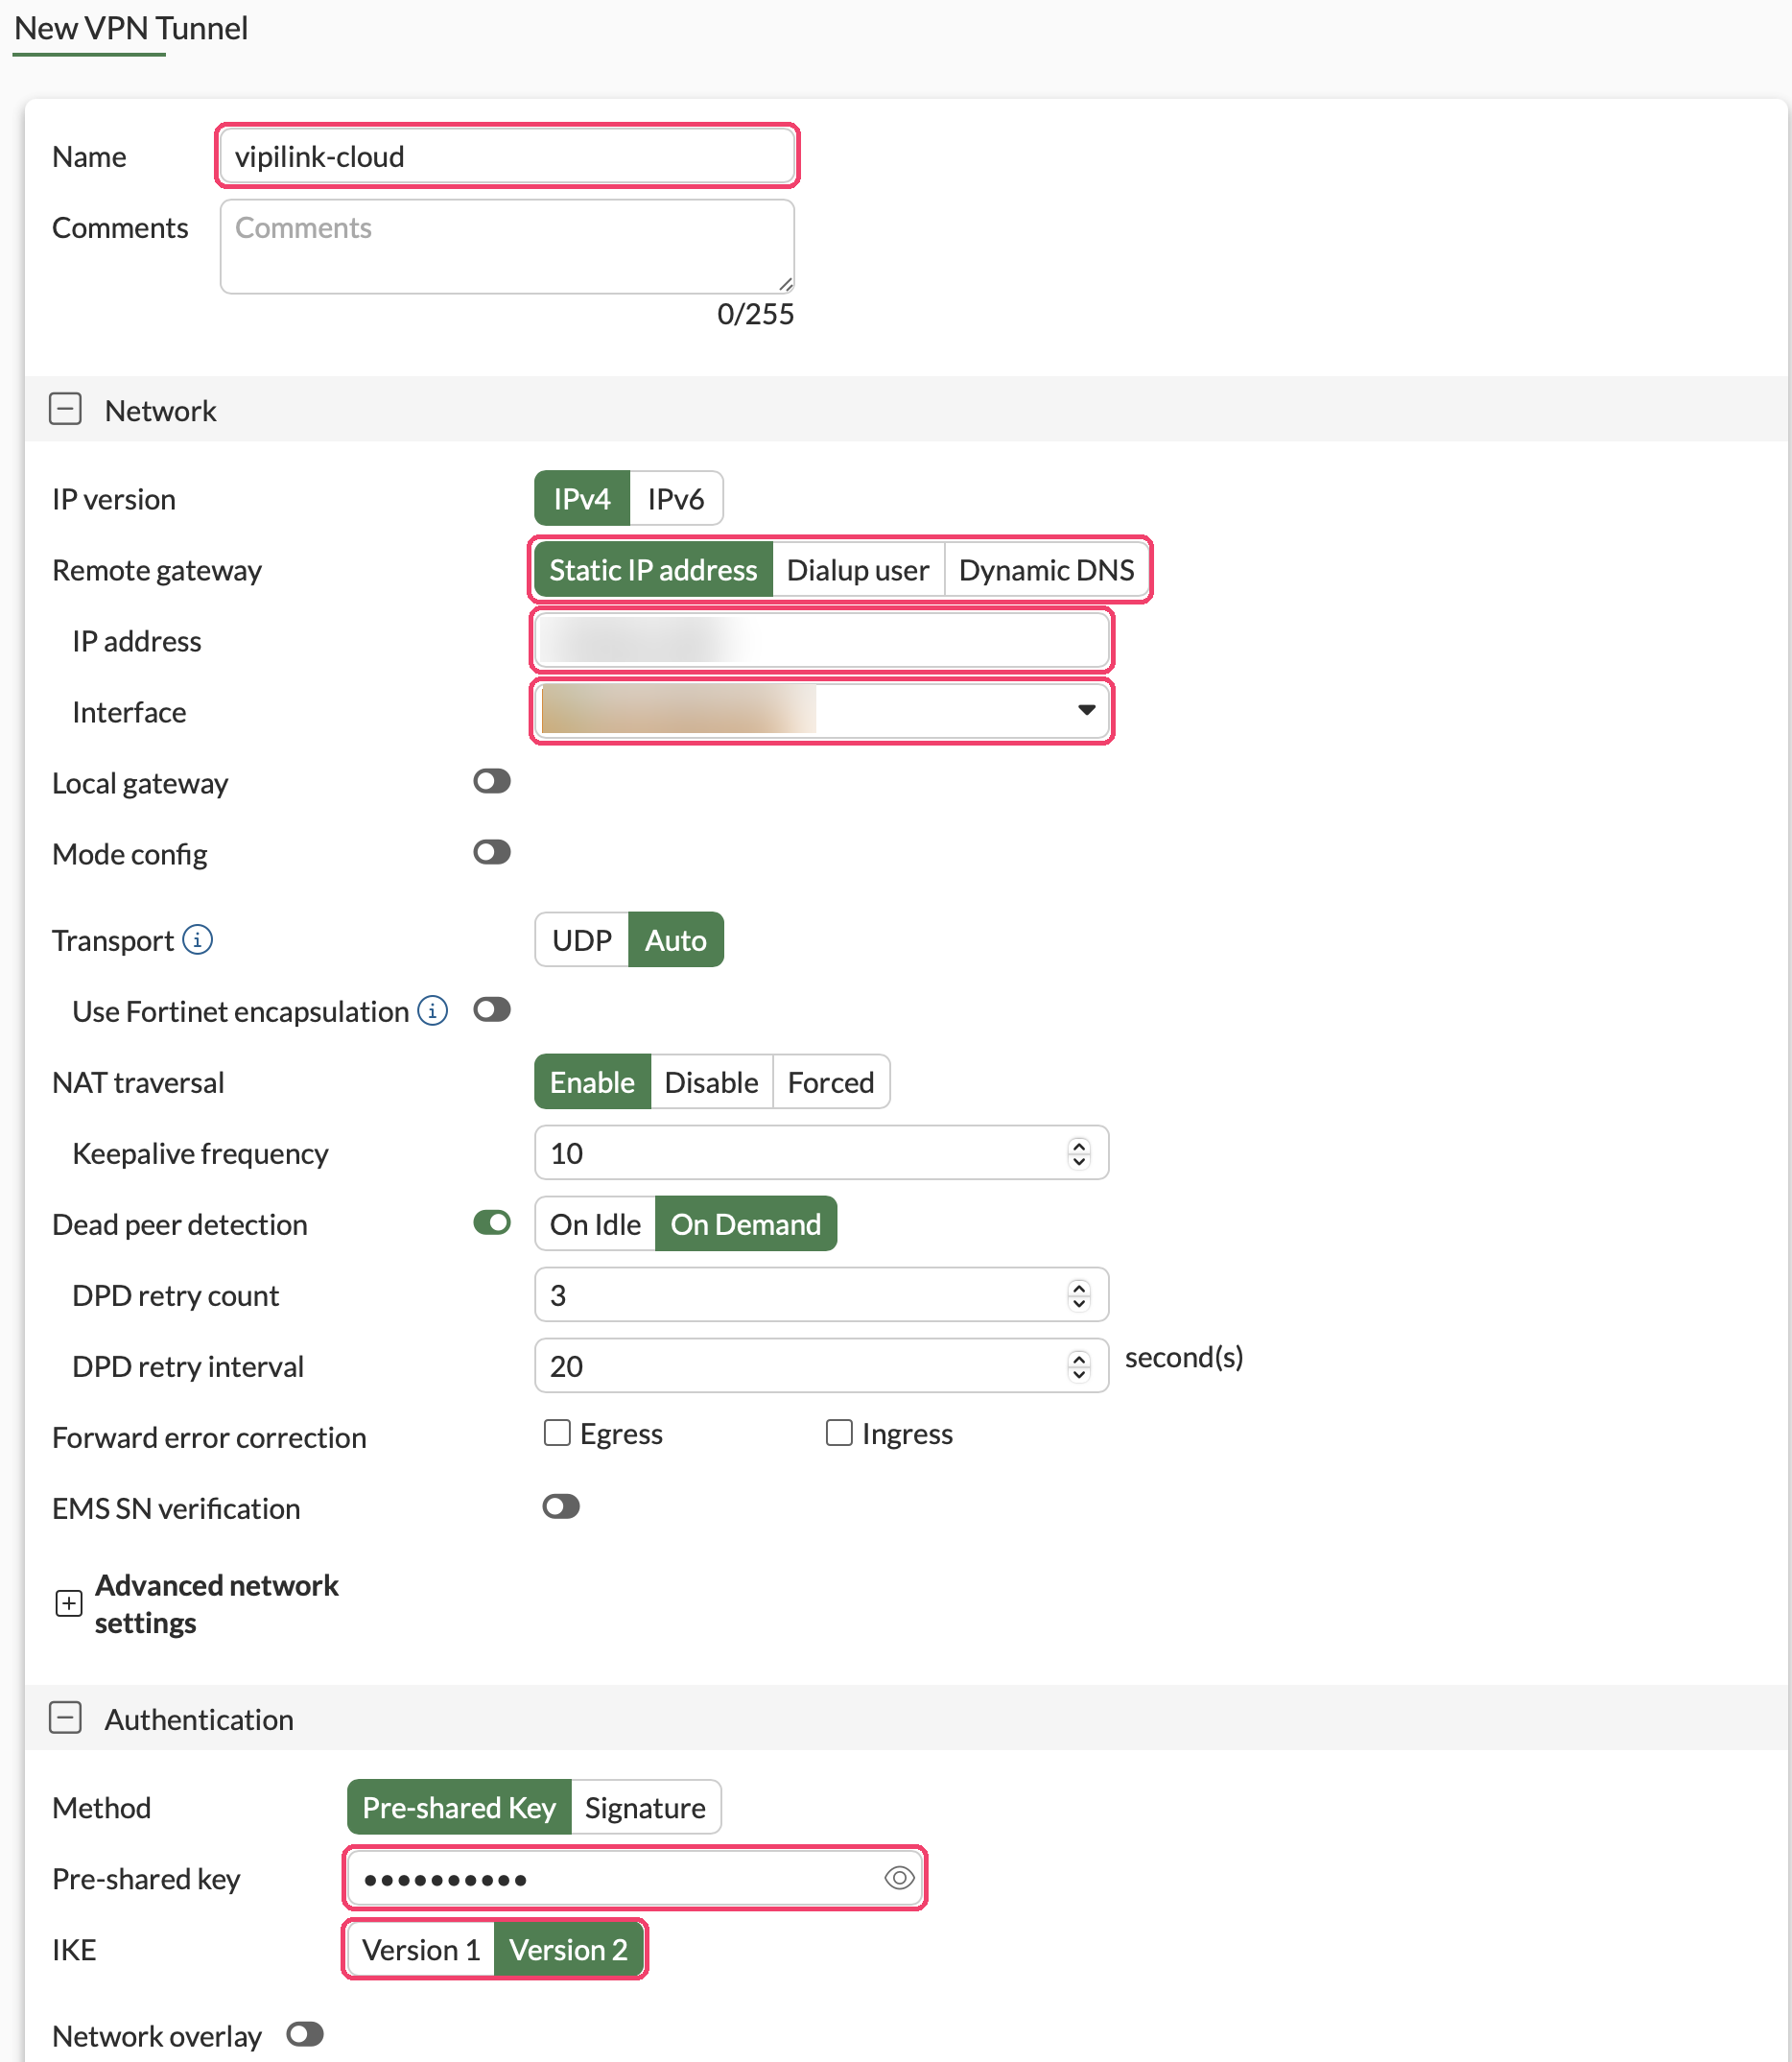
-
Under Phase 1 proposal:
Field Value Encryption - authentication AES256 - SHA256. Delete the other pairs. Diffie-Hellman groups 14 only Key lifetime 28800secondsLeave Local ID empty.
-
Under Phase 2 selectors, click Create new.
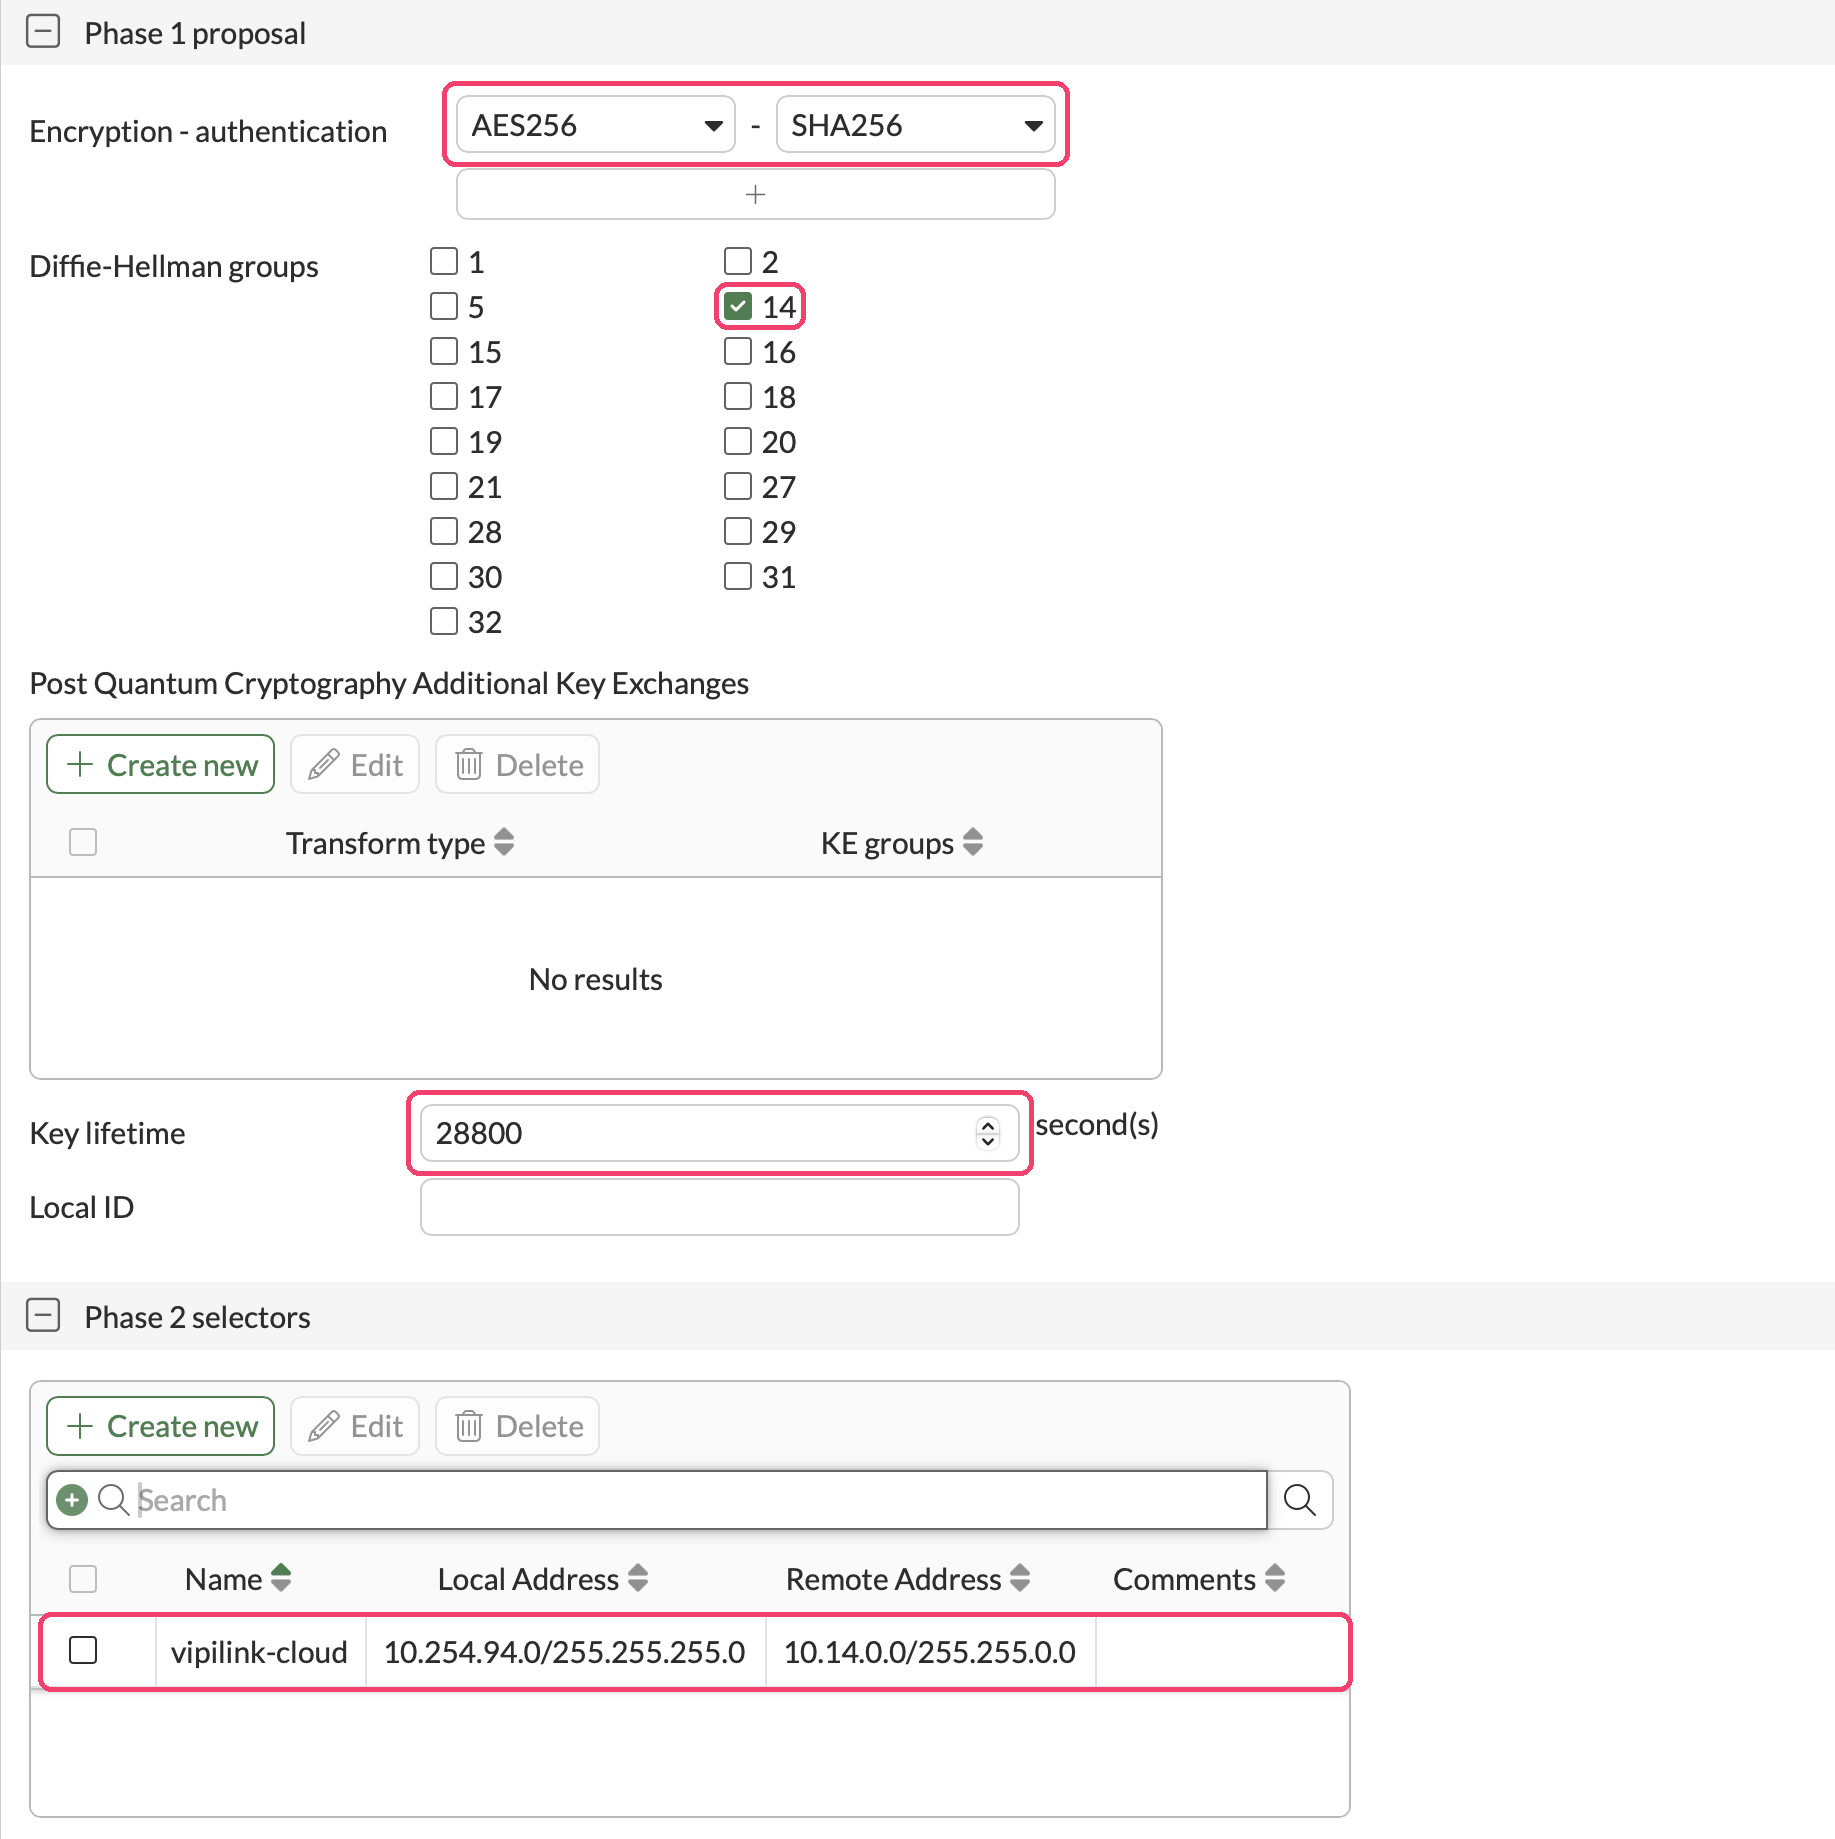
-
Fill in the New Phase 2 Selector:
Field Value Name vipilink-cloudEncapsulation Tunnel Mode Local address Subnet Address, the office subnet, for example 10.254.94.0 255.255.255.0Remote address Subnet Address, the Vipilink network subnet, for example 10.14.0.0 255.255.0.0Then open Advanced:
Field Value Encryption - authentication AES256 - SHA256. Delete the other pairs. Replay detection Enable Perfect forward secrecy (PFS) Enable Diffie-Hellman groups 14 only. The list shows only while PFS is on. Local port, Remote port, Protocol All Auto-negotiate Enable. The tunnel comes up without waiting for traffic. Key lifetime Seconds, 3600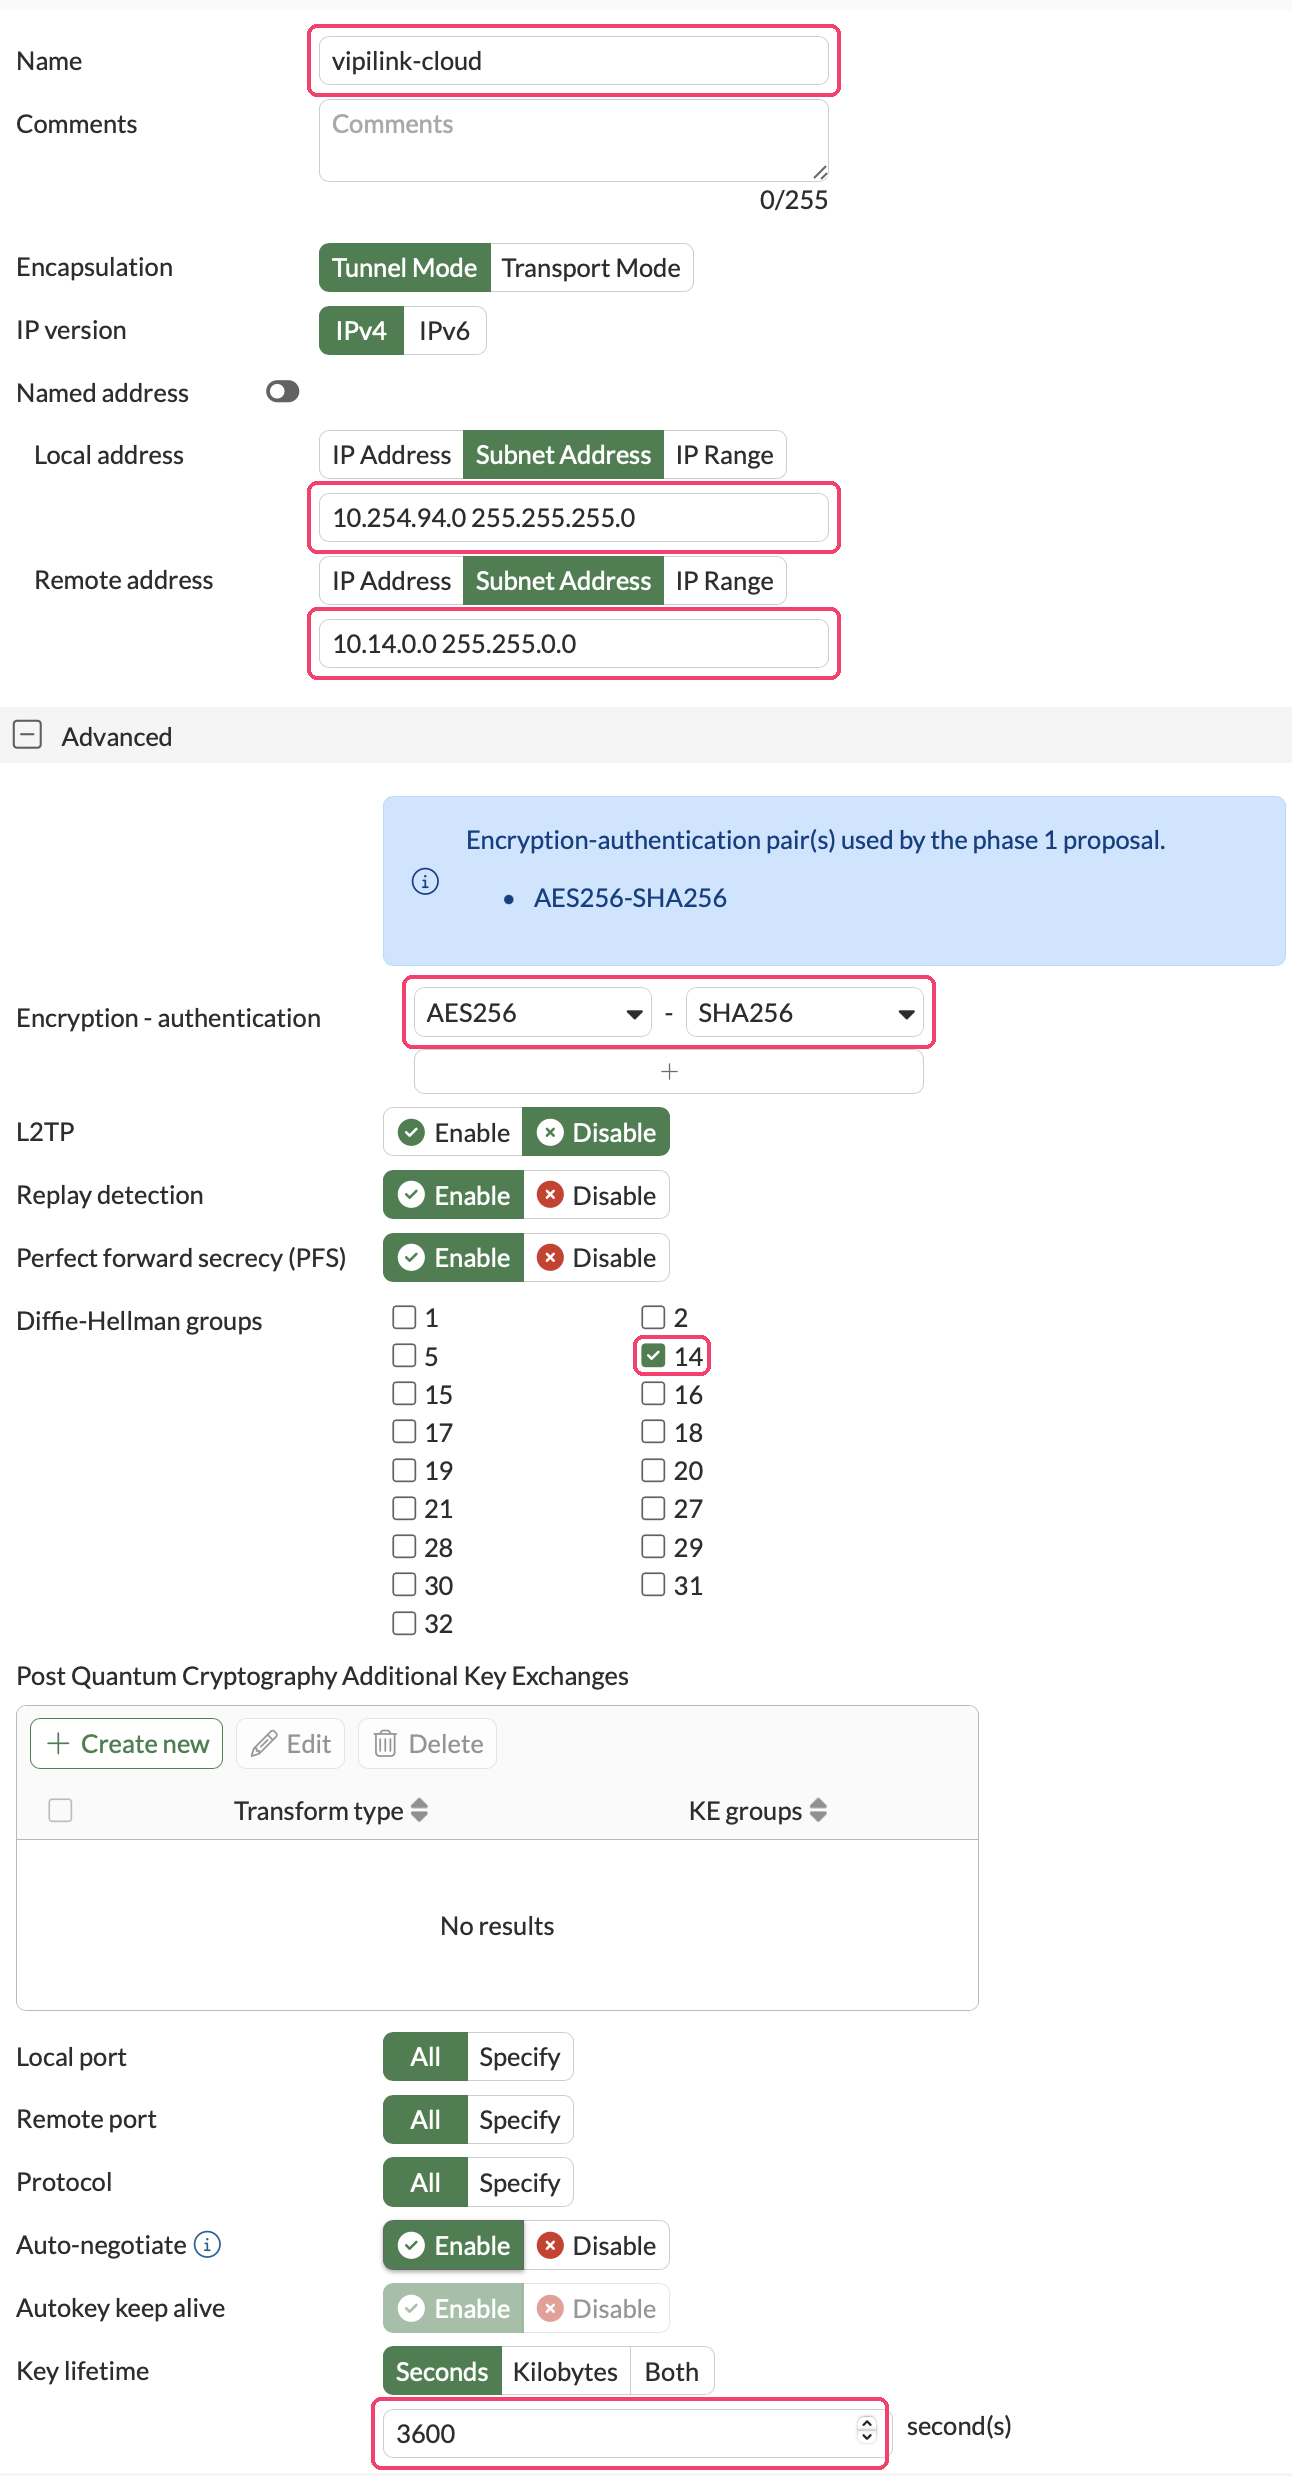
The local and remote addresses must match the subnets in the Vipilink tunnel, the other way around: Local address is the Vipilink Remote Side Subnets, and Remote address is the Vipilink Vipilink Side Subnets. If you chose Any in Vipilink, use
0.0.0.0 0.0.0.0here. -
Click OK to save the selector, then OK to save the tunnel.
Step 5: Add the static routes on the FortiGate
Add a route that sends traffic for the Vipilink network into the tunnel, and a second route that drops this traffic when the tunnel is down. Without the second route, the traffic would follow the default route and leave through the WAN unencrypted.
- Go to Network → Static Routes and click Create new.
-
Add the tunnel route:
Field Value Destination Named Address, then vipilink-cloudInterface vipilink-cloud(the tunnel)Administrative Distance 10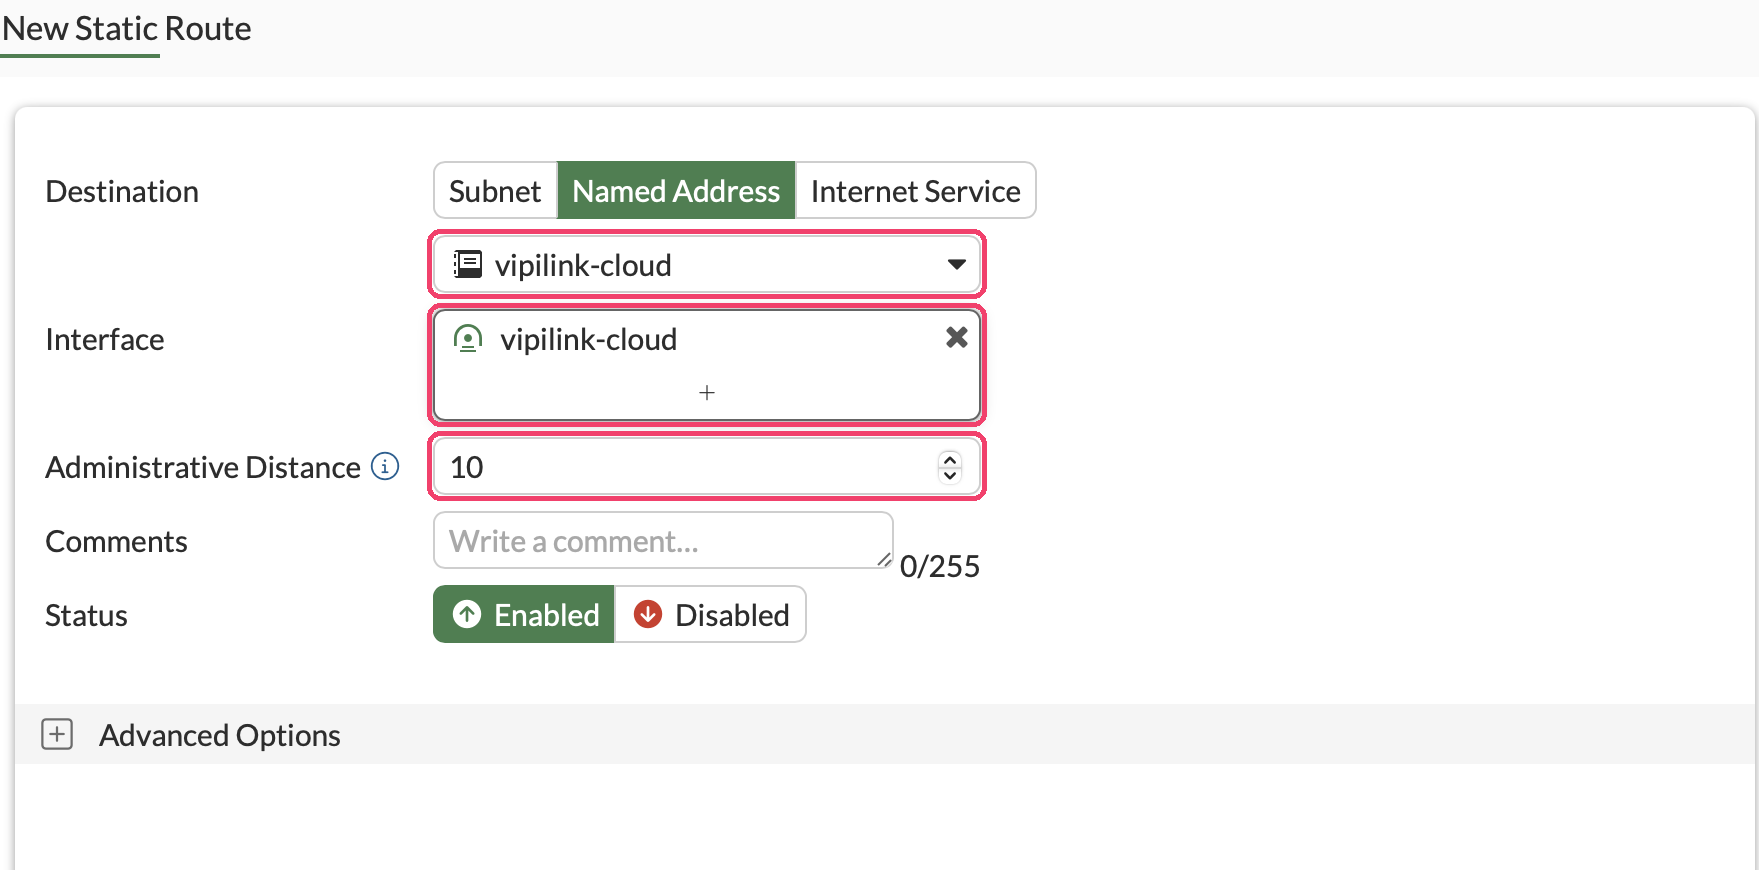
-
Click OK, then Create new again and add the blackhole route:
Field Value Destination Named Address, then vipilink-cloudInterface Blackhole Administrative Distance 254Comments For example Drop Vipilink traffic when the tunnel is down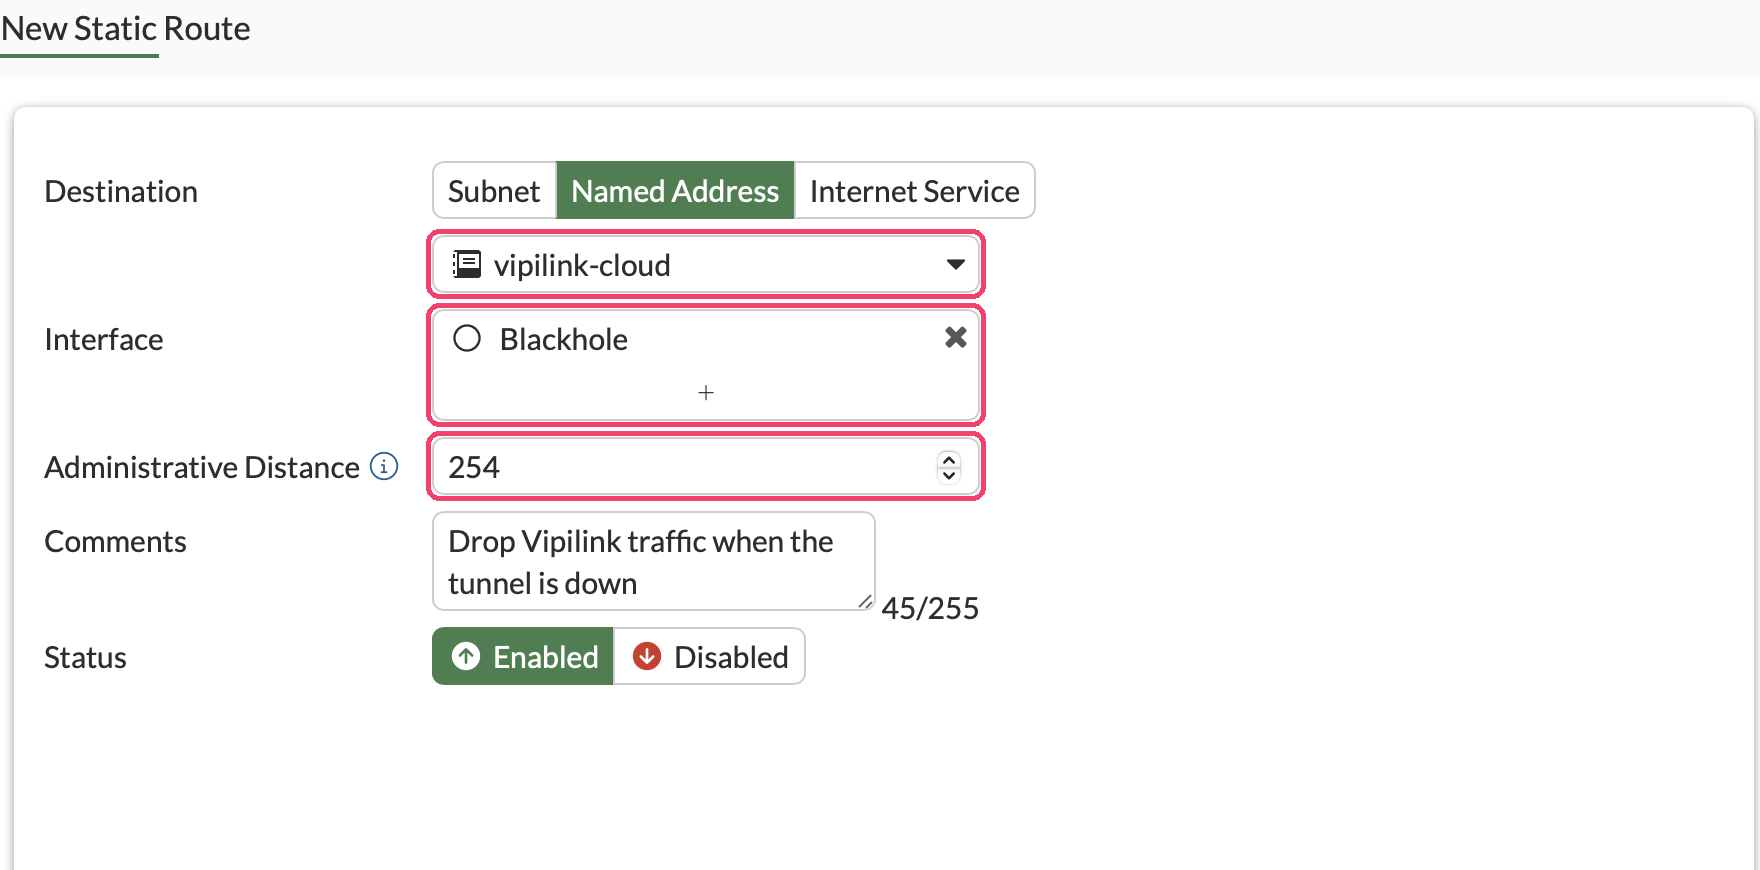
-
Click OK.
Step 6: Add the firewall policies on the FortiGate
Add one policy for each direction. Keep NAT off, so each side sees the other side's real IP addresses.
- Go to Policy & Objects → Firewall Policy and click Create new.
-
Add the policy from the office to Vipilink:
Field Value Name office-to-vipilinkAction ACCEPT Incoming interface Your LAN interface Outgoing interface vipilink-cloudSource office-lanDestination vipilink-cloudService ALL, or only the services users needNAT Off 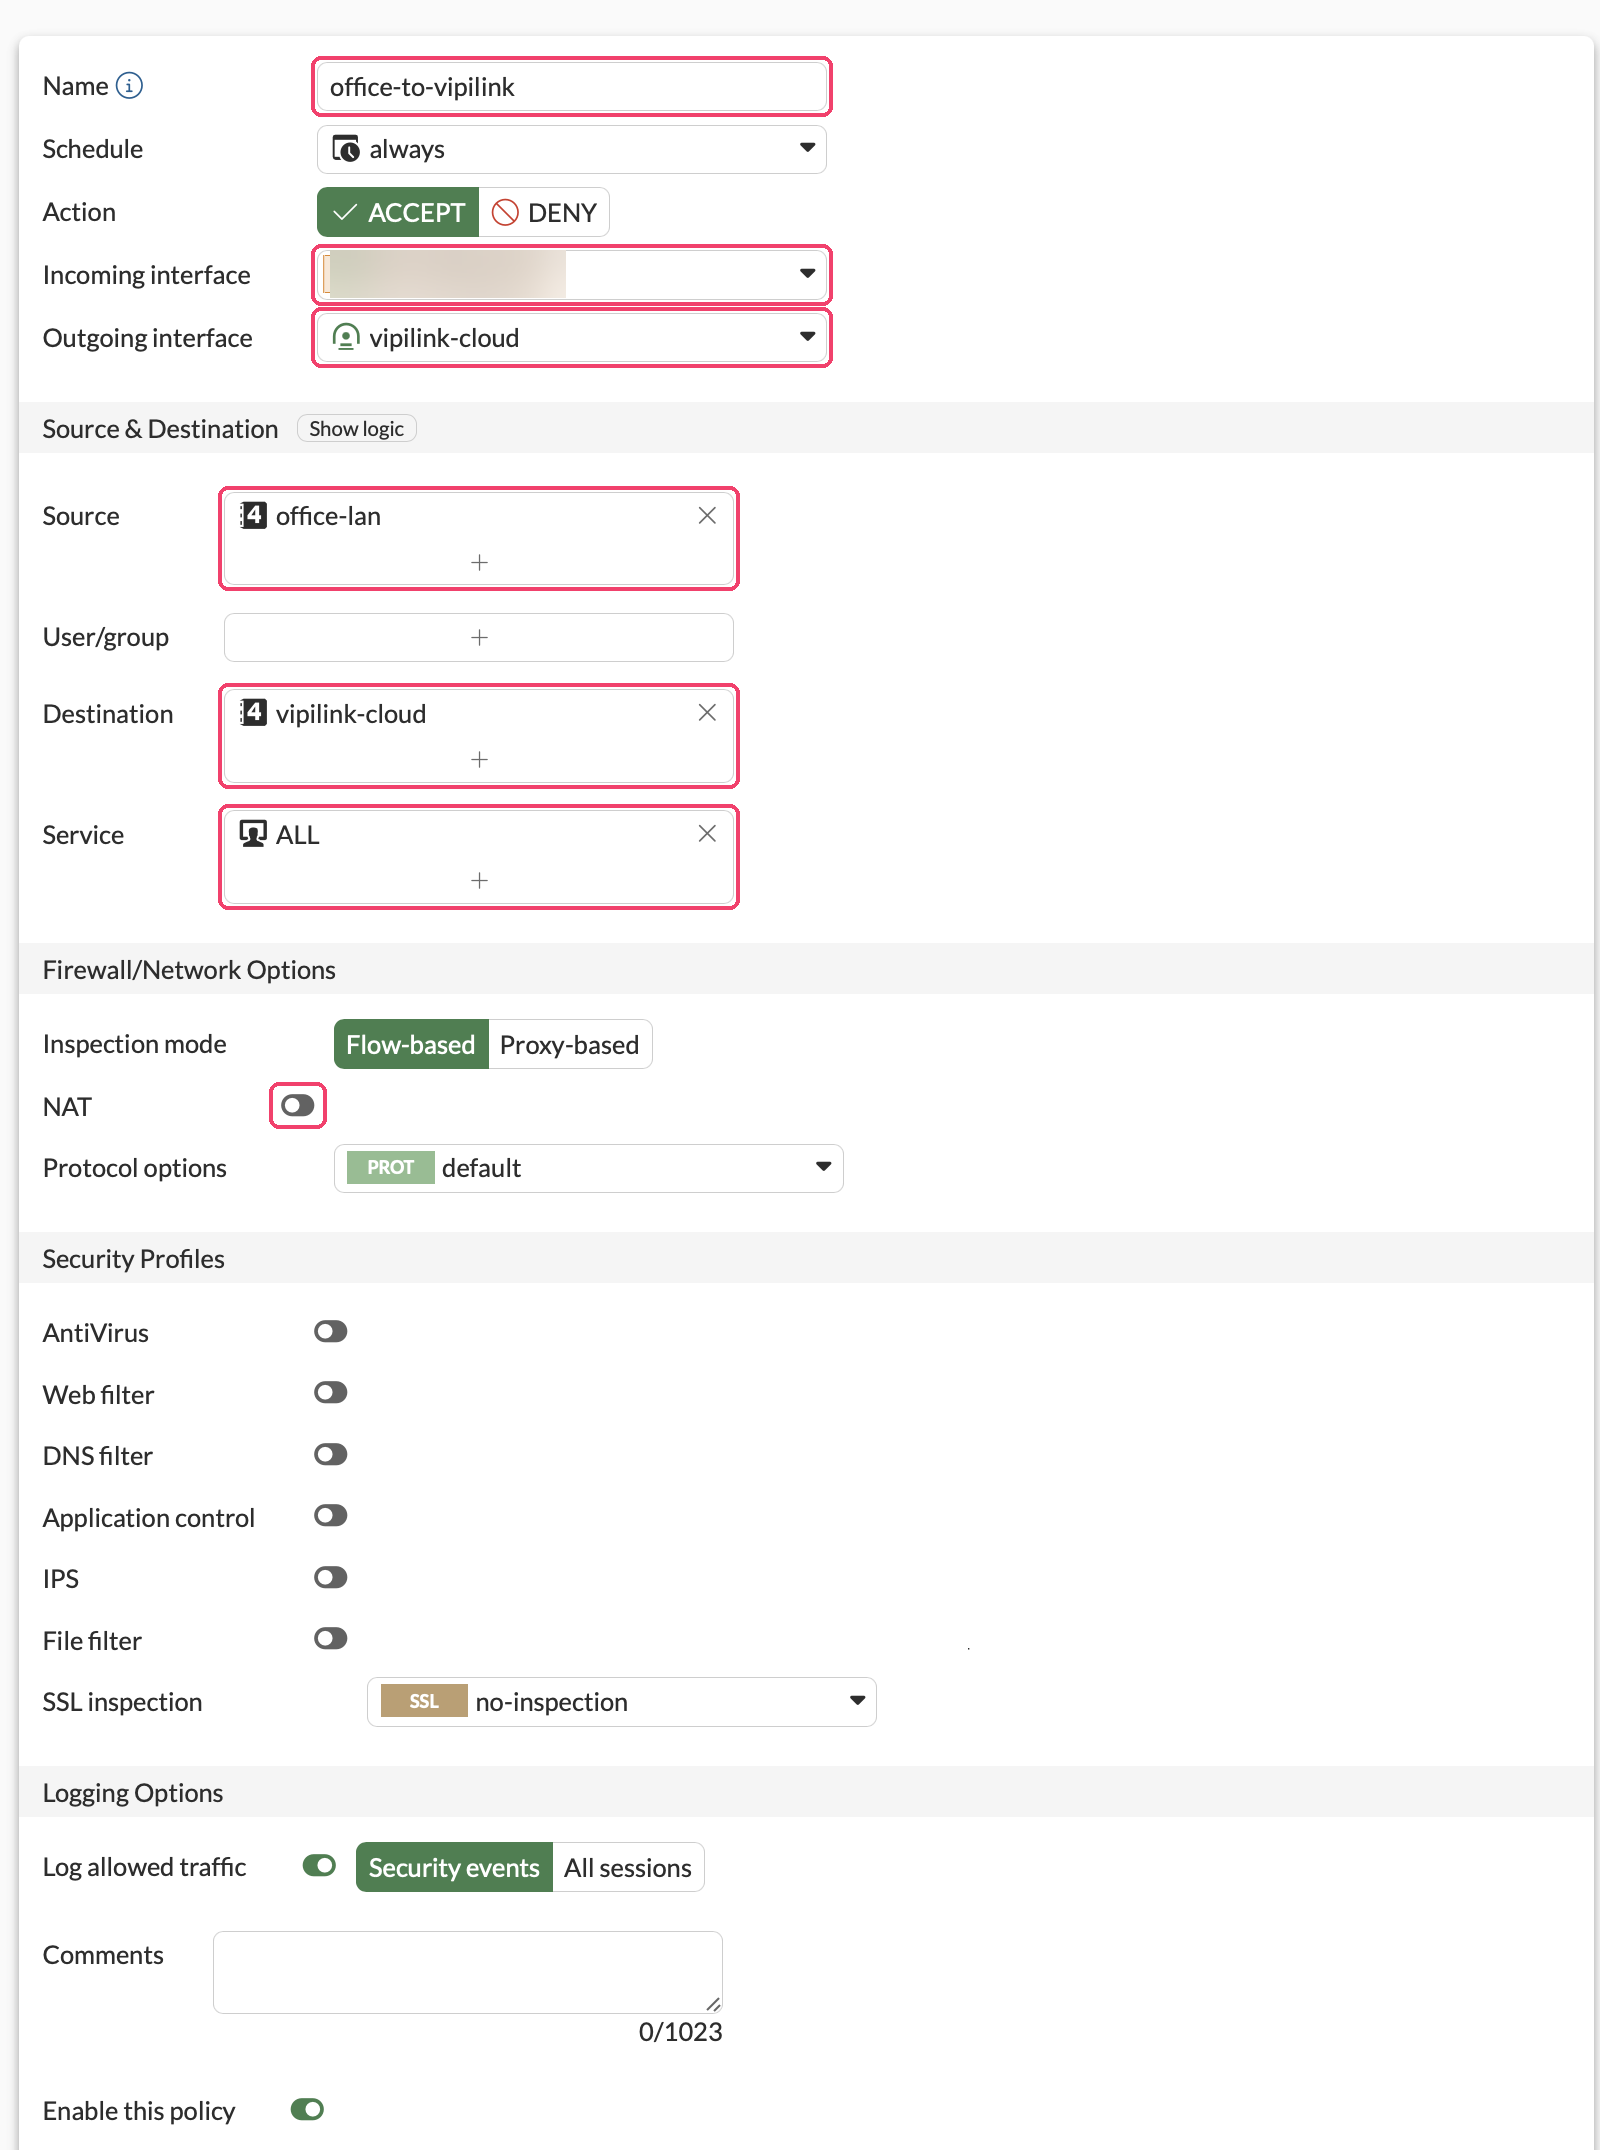
-
Click OK, then Create new again and add the policy from Vipilink to the office:
Field Value Name vipilink-to-officeAction ACCEPT Incoming interface vipilink-cloudOutgoing interface Your LAN interface Source vipilink-cloudDestination office-lanService ALL, or only the services users needNAT Off 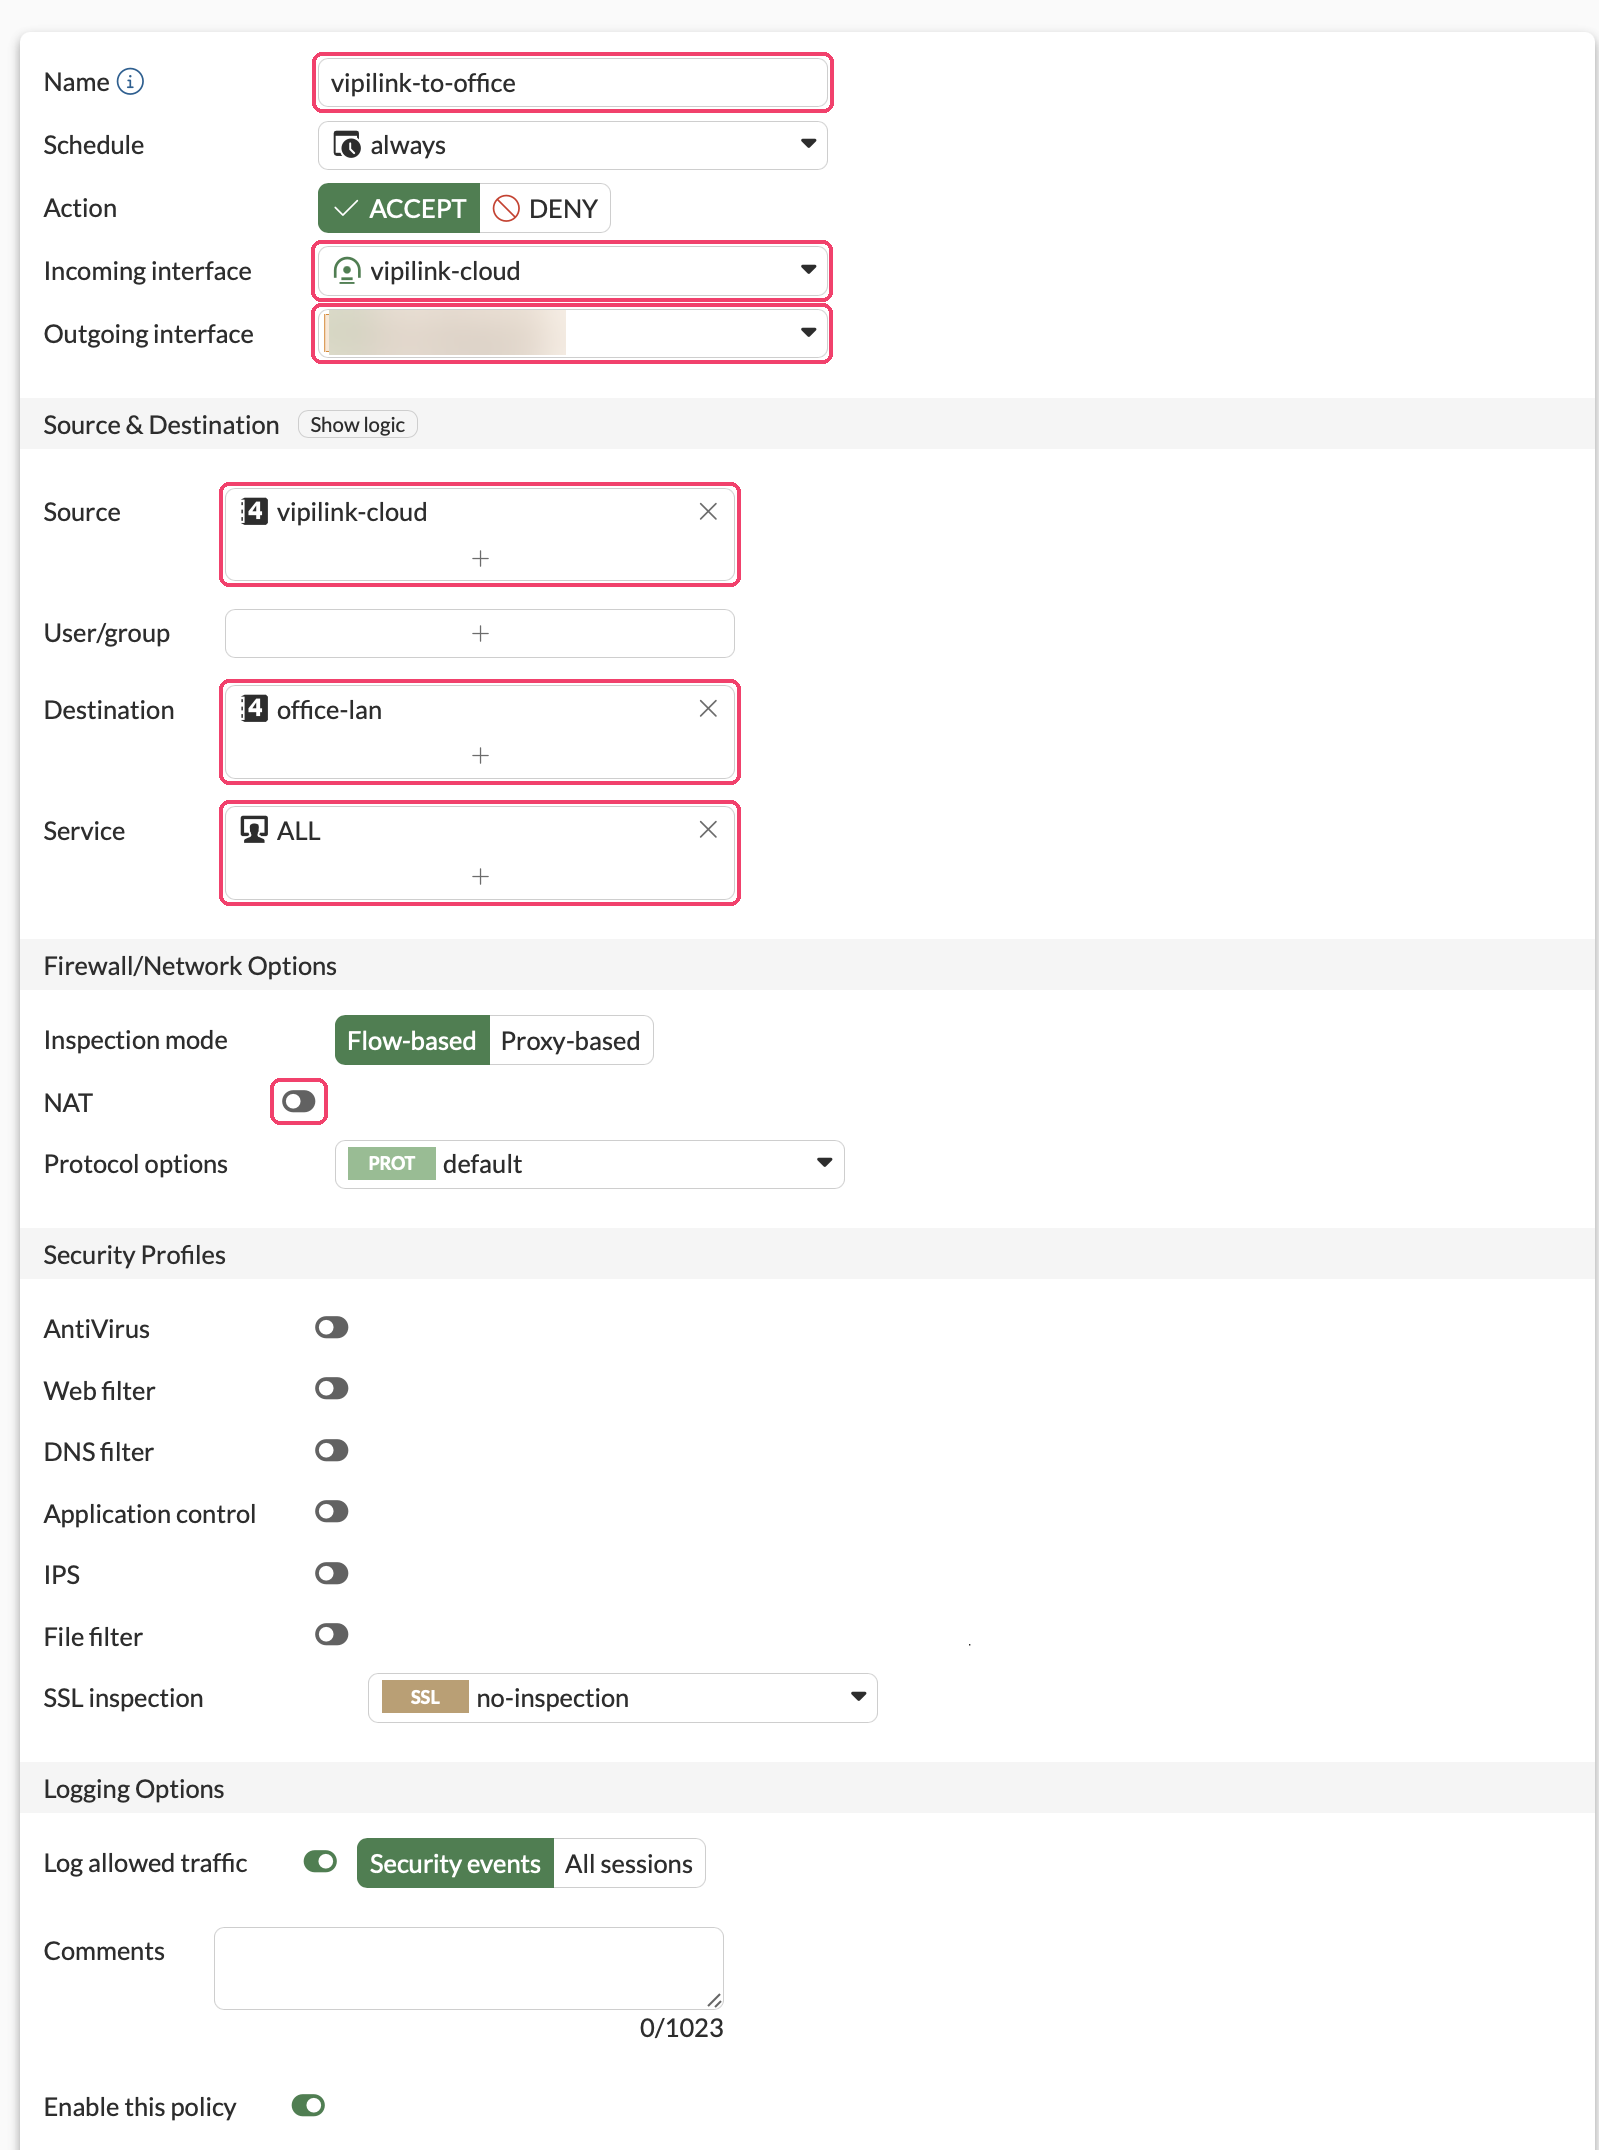
-
Click OK. Both policies show in the list with NAT disabled.

Step 7: Check the connection
-
On the FortiGate, go to VPN → VPN Tunnels. The
vipilink-cloudtunnel shows Up.
-
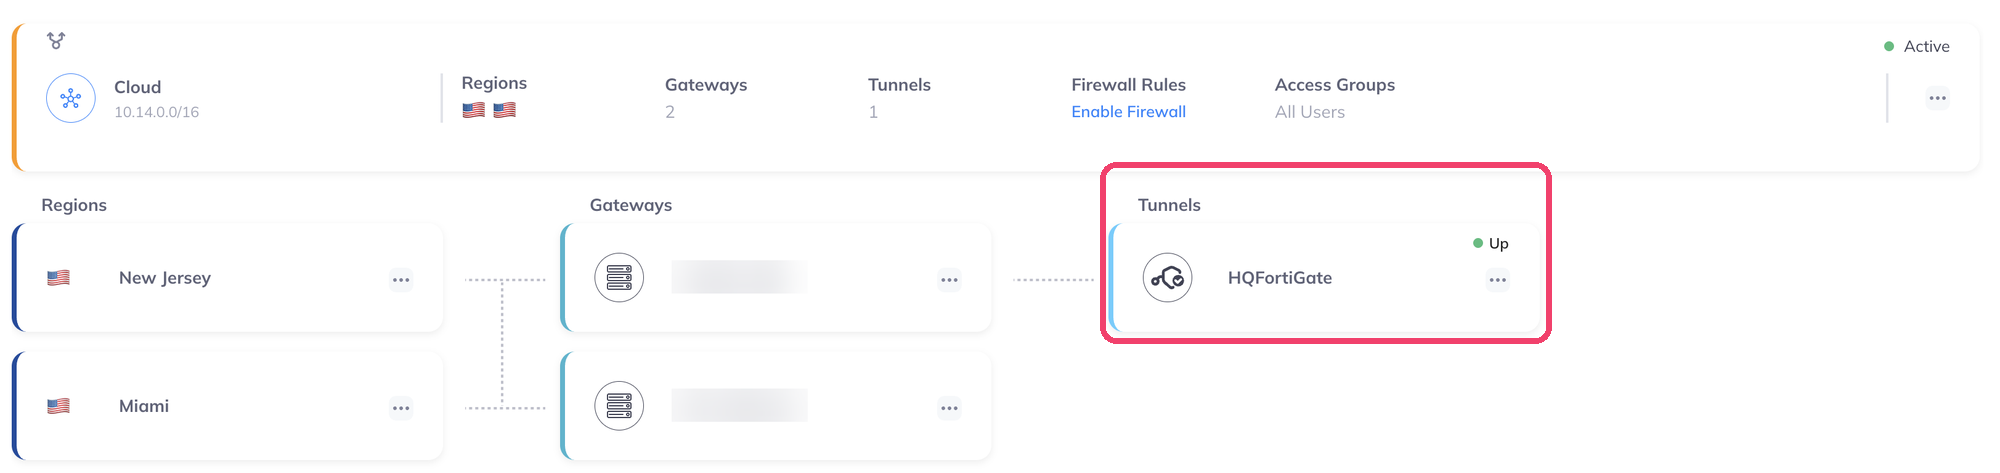
In the Vipilink console, the tunnel card shows Up.
-
Connect a device to the network with the Vipilink agent and reach a device in the office, for example with
pingto a private IP.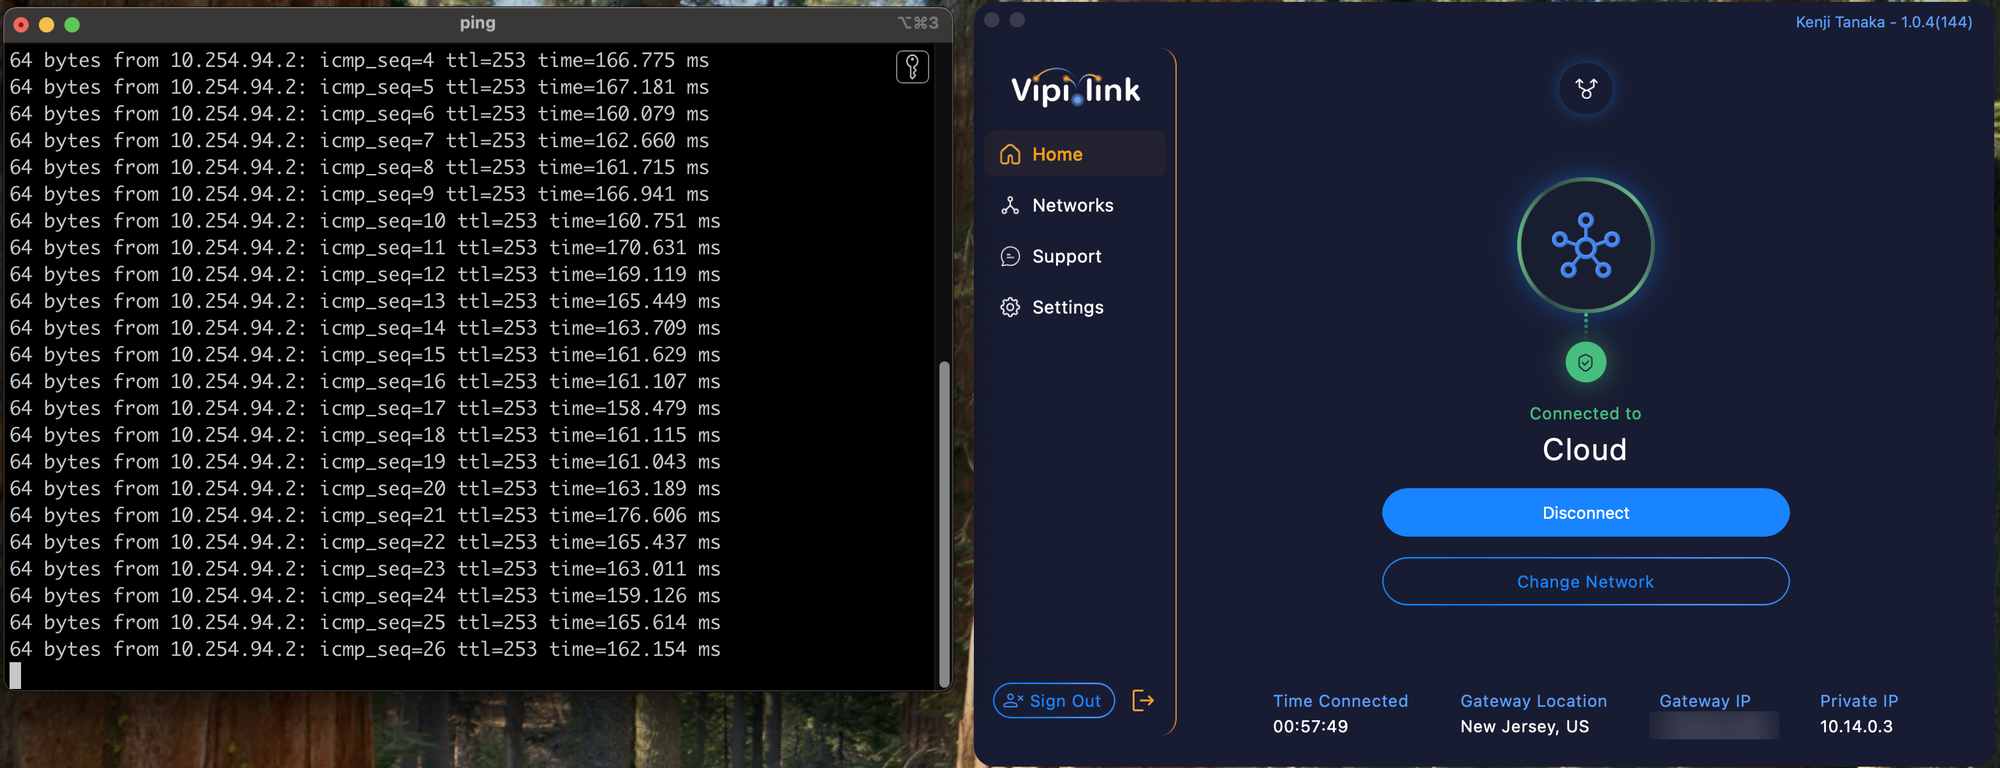
Troubleshooting
| Problem | What to check |
|---|---|
| Tunnel stays Down | The pre-shared key is the same on both sides. In Vipilink, Remote Public IP and Remote ID are the FortiGate WAN IP. On the FortiGate, IP address is the Vipilink gateway public IP. The phase 1 and phase 2 settings match the table above. |
| Tunnel is Up but nothing responds | The phase 2 local and remote addresses match the Vipilink subnets. Both static routes and both firewall policies exist, with NAT off. If split tunneling is Manual, the office subnet is in the list. |
| Traffic works in one direction only | The policy for the other direction is missing or has the wrong interfaces. |
For every field of the Vipilink tunnel form, see IPsec tunnel.