IPSec site-to-site configuration guide with Cisco ASA
1. Login to Vipilink portal and create network
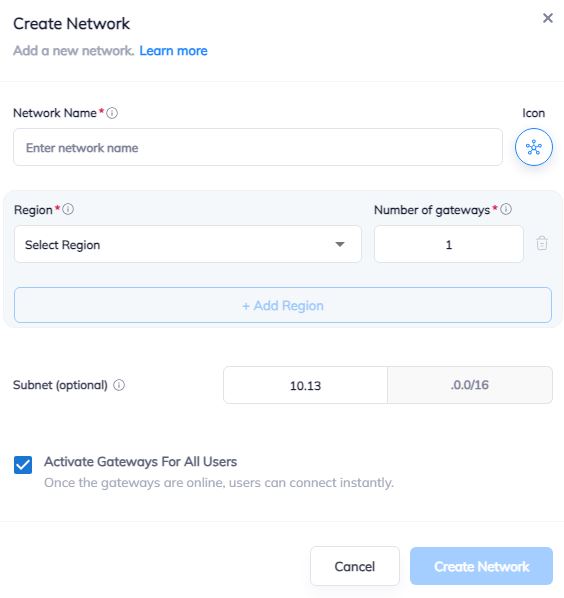
1.1 Go to Networks section and create a new network.
1.2 Define the network name.
1.3 Select the region and gateways number.
1.4 Choose the subnet.
1.5 Activate gateways for all users section is active by default. If you want to disable this function - just remove the mark.
2. Create the IPsec tunnel in the Vipilink portal
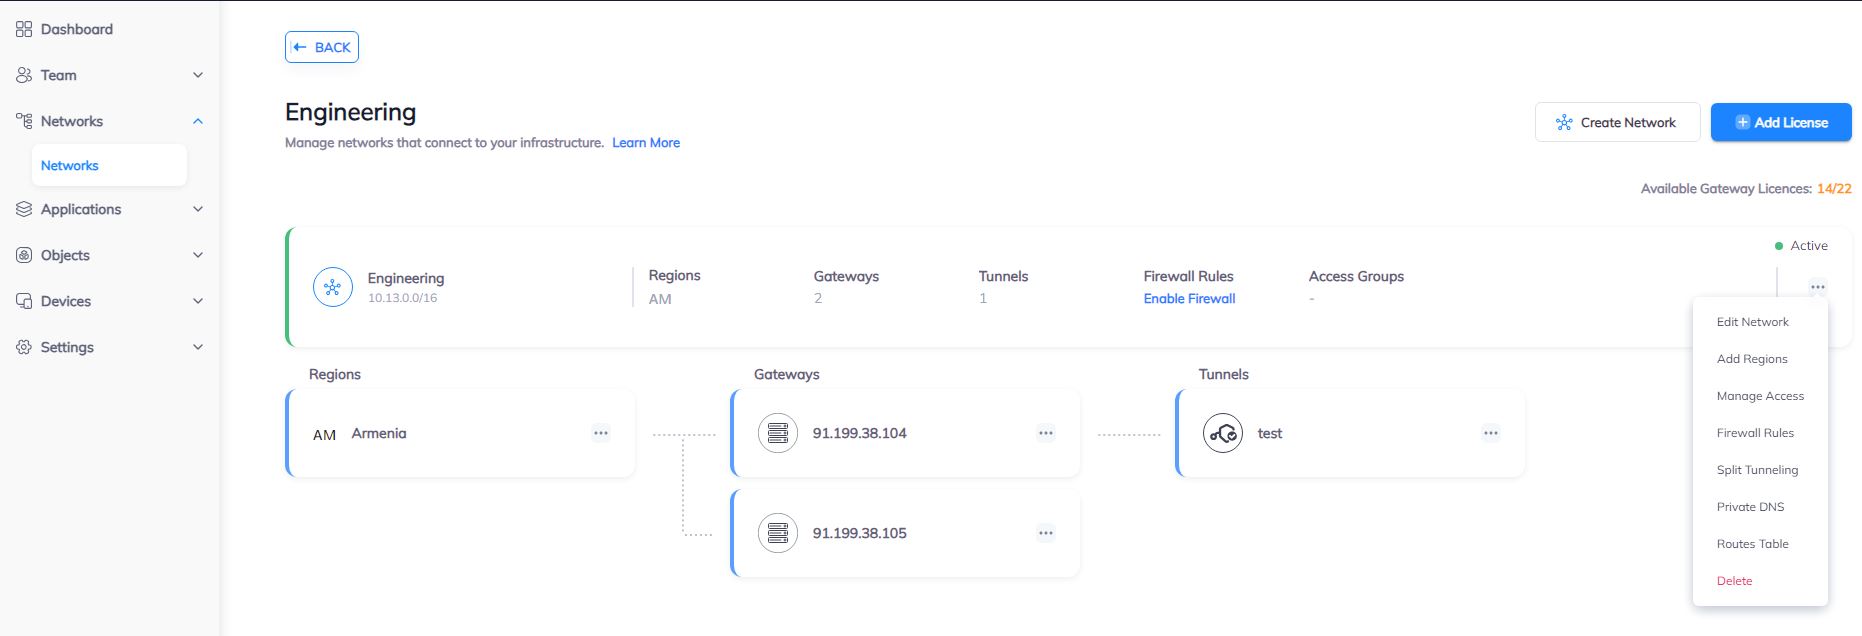
2.1 Go to Networks section and click on the subnet that you created in Step-1.
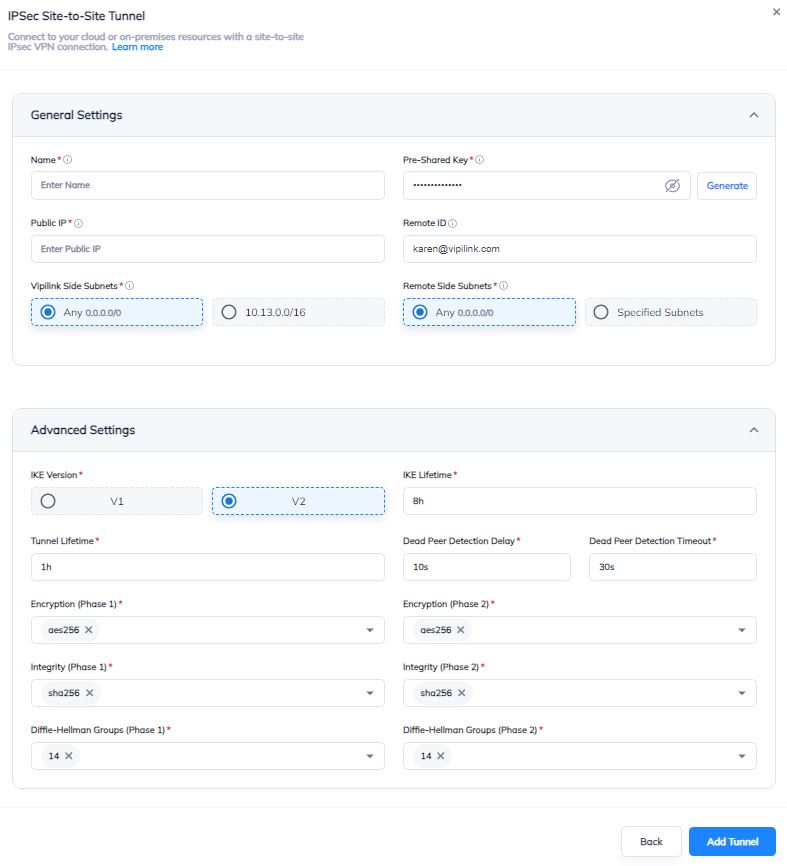
2.2 Click on Gateway and add a Tunnel. Choose IPSec Site-to-Site Tunnel and press to continue.
2.3 Choose between a Single-Tunnel and Dual-Tunnel.
2.4 General Settings Values
-
Name
-
Public IP
-
Vipilink Side Subnets
-
Pre-Shared Key
-
Remote ID
-
Remote Side Subnets
2.5 Advanced Settings Values
-
Ike Version
-
Tunnel Lifetime
-
Encryption (Phase 1)
-
Integrity (Phase 1)
-
Diffie-Helman Groups (Phase 1)
-
Ike Lifetime
-
Dead Peer Detection Delay
-
Dead Peer Detection Timeout
-
Encryption (Phase 2)
-
Integrity (Phase 2)
-
Diffie-Helman Groups (Phase 2)
2.6 You can also manage a Network, Regions, Access, Firewall Rules, Routes Table, enable Split Tunneling and Private DNS.
** Create the IPsec tunnel on ASA (CLI)**
1.1 Log in to Cisco ASA firewall and enter enable mode.
1.2 Create the tunnel profile and the proposal.
 crypto ipsec ikev2 ipsec-proposal vipilink_proposal
 protocol esp encryption aes-256
 protocol esp integrity sha-256

 crypto ipsec profile vipilink_profile
 set ikev2 ipsec-proposal vipilink_proposal
 set pfs group14
 set security-association lifetime seconds 3600
1.3 Create a crypto policy
crypto ikev2 policy 20
encryption aes-256
integrity sha256
group 14
prf sha256
lifetime seconds 28800
crypto ikev2 enable outside
1.4 Create a group policy and tunnel group
 group-policy vipilink_group_policy internal
 group-policy vipilink_group_policy attributes
 vpn-tunnel-protocol ikev2

 tunnel-group x.x.x.x type ipsec-l2l
 tunnel-group x.x.x.x general-attributes
 default-group-policy vipilink_group_policy
 tunnel-group x.x.x.x ipsec-attributes
 ikev2 remote-authentication pre-shared-key Type_Your_Secret
 ikev2 local-authentication pre-shared-key Type_Your_Secret
1.5 Create Virtual Tunnel Interface (VTI)
 interface Tunnel1
 nameif vipilink_x.x.x.x
 ip address x.x.x.x x.x.x.x
 tunnel source interface outside
 tunnel destination x.x.x.x
 tunnel mode ipsec ipv4
 tunnel protection ipsec profile vipilink_profile
** Create the IPsec tunnel on ASA (ASDM)**
1.1 Log in to Cisco ASA ASDM.
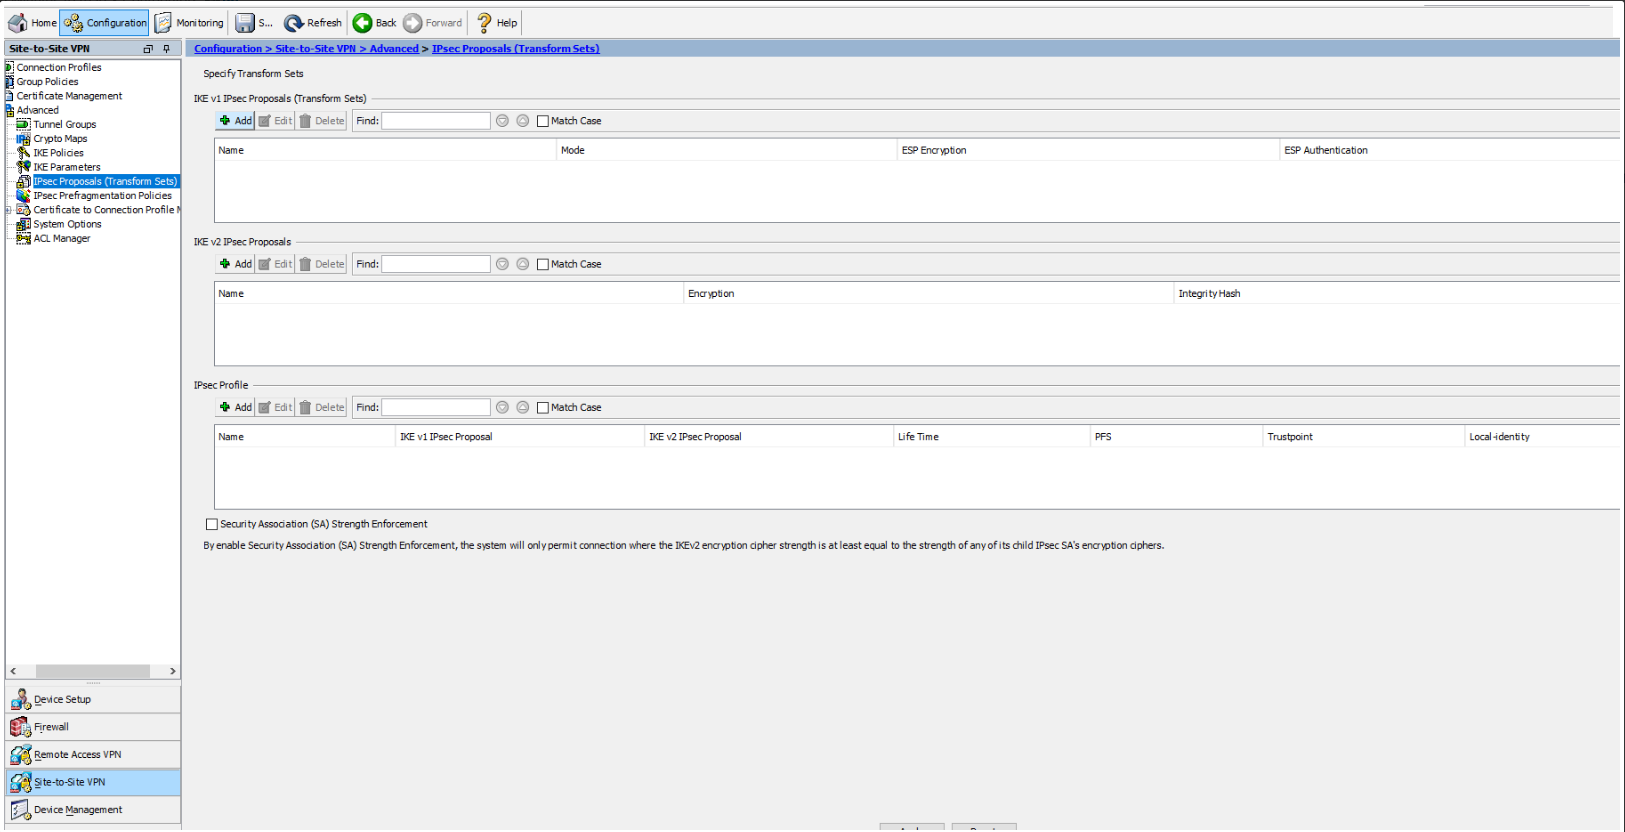
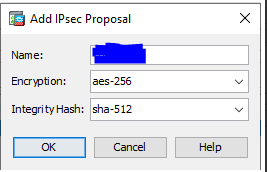
1.2 Go to Configuration/Site-to-Site VPN/Advanced/IPsec Proposals (Transform Sets) and add IKE v2 IPsec Proposal.
-
Name - vipilink_proposal
-
Encryption - aes-256
-
Integrity Hash - sha-256
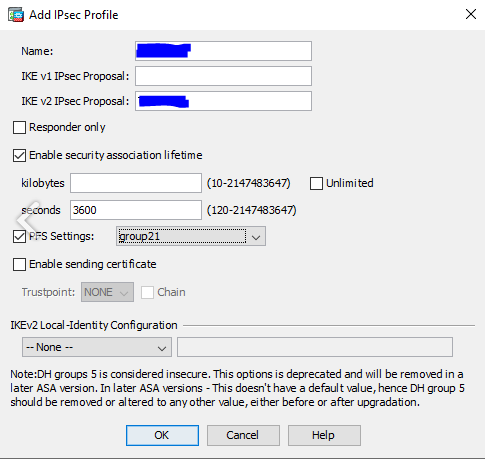
1.3 Navigate to Configuration/Site-to-Site VPN/Advanced/IPsec Proposals (Transform Sets) and add IPsec Profile.
-
Name - vipilink_profile
-
IKE v2 IPsec Proposal - vipilink_proposal
-
Responder only - unchecked
-
Enable security association lifetime - checked, 3600 seconds
-
PFS Settings - checked, group 14
1.4 Go to Configuration/Site-to-Site VPN/Advanced/IKE Policies and add new IKE v2 Policy.
-
Priority - 10
-
D-H Group - 21
-
Encryption - aes-256
-
Integrity Hash - sha256
-
Pseudo Random Function (PRF) Hash - sha256
-
Lifetime - 28800 seconds

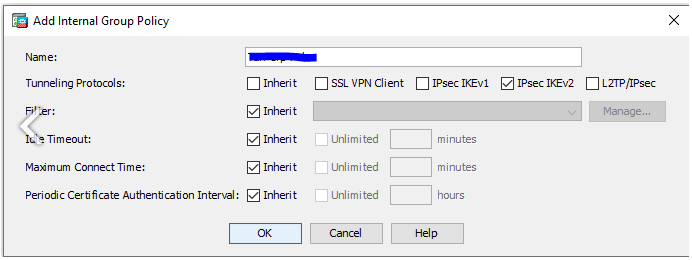
1.5 Navigate to Configuration/Site-to-Site VPN/Group Policies and add new policy.
-
Name - vipilink_group_policy
-
Tunneling Protocols - IPsec IKEv2
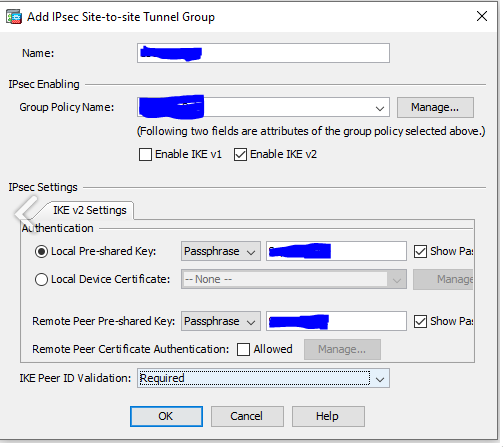
1.6 Go to Configuration/Site-to-Site VPN/Advanced/Tunnel Groups and create new one.
-
Name - Vipilink Gateway Public IP
-
Group Policy Name - vipilink_group_policy
-
Local Pre-shared Key - Type_your_secret
-
Remote Pre-Shared Key - Type_your_secret
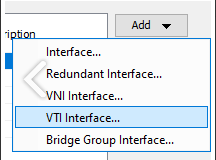
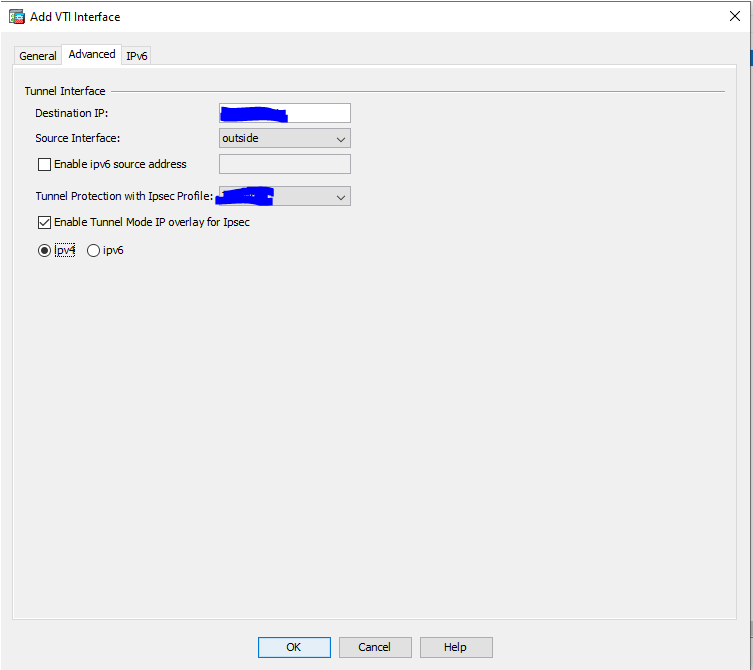
2.1 Navigate to Configuration/Device Setup/Interface Settings/Interfaces and add VTI Interface.
General
-
VTI ID - 1
-
Interface Name - tunnel1
-
Cost - 1
-
Enable Interface - checked
-
IP Address - ASA WAN IP
-
Subnet Mask - Subnet Mask of ASA WAN IP
-
Description - tunnel to Vipilink

Advanced
-
Destination IP - Vipilink Gateway Public IP
-
Source Interface - outside
-
Tunnel Protection with Ipsec Profile - vipilink_profile
-
Enable Tunnel Mode IP overlay for Ipsec - checked, ipv4
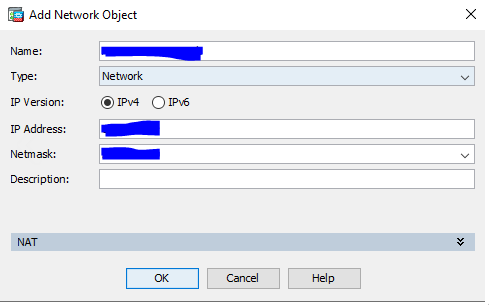
3.1 Create the object for the Vipilink Local Network.
-
Name - vipilink_local_net
-
Type - Network
-
IP Version - IPv4
-
IP Address - x.x.x.x
-
Netmask - x.x.x.x
-
Description - Vipilink_local_net
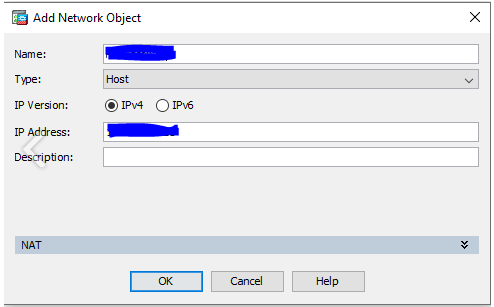
3.2 Create a object vor Vipilink Gateway Public IP.
-
Name - vipilink_gateway_ip
-
Type - host
-
IP Version - IPv4
-
IP Address - Vipilink Public IP
-
Description - vipilink_public_ip
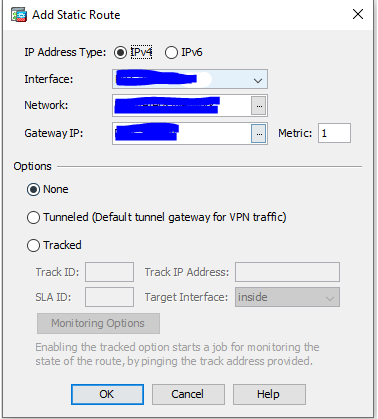
3.3 Go to Configuration/Device Setup/Routing/Static Routes and create new route.
-
IP Address Type - IPv4
-
Interface - tunnel1
-
Network - vipilink_local_net
-
Gateway IP - vipilink_gateway_ip
-
Metric - 1
5.1 Verify connectivity between local and remote networks.
-
Use tools like ping or traceroute to check the connection
-
Ensure that resources on the remote network (e.g., shared folders, servers) are accessible from the local network.